Snowflake Transformation
Snowflake has many advantages:
- No database administration
- No indexes, sort keys, distribution styles, or column compressions
- Easy scaling
- Simple data types
- Amazing processing power and data throughput
Limits
Section titled “Limits”- Snowflake queries are limited to 7,200 seconds by default.
- Queries containing comments longer than 8,192 characters will segfault.
- Constraints (like PRIMARY KEY or UNIQUE) are defined but not enforced.
Snowflake is a cloud database and, as such, brings continuous updates and behavioral changes. If you are interested in those changes, please follow the official Snowflake release notes.
When loading data to a Snowflake transformation, beware that there are two different methods: copy and clone.
Aborting Transformation Execution
Section titled “Aborting Transformation Execution”In some cases, you may need to abort the transformation execution and exit with an error message.
To abort the execution, set the ABORT_TRANSFORMATION variable to any nonempty string value.
SET ABORT_TRANSFORMATION = ( SELECT CASE WHEN COUNT = 0 THEN '' ELSE 'Integrity check failed' END FROM ( SELECT COUNT(*) AS COUNT FROM INTEGRITY_CHECK WHERE RESULT = 'failed' ));This example will set the ABORT_TRANSFORMATION variable value to 'Integrity check failed' if the INTEGRITY_CHECK table
contains one or more records with the RESULT column equal to the value 'failed'.
The transformation engine checks the ABORT_TRANSFORMATION after each successfully executed query and returns the value
of the variable as a user error, Transformation aborted: Integrity check failed. in this case.

Dynamic Backends
Section titled “Dynamic Backends”If you have a large amount of data in databases and complex queries, your transformation might run for a couple of hours. To speed it up, you can change the backend size in the configuration. Snowflake transformations support the following sizes:
- XSmall
- Small (default)
- Medium
- Large
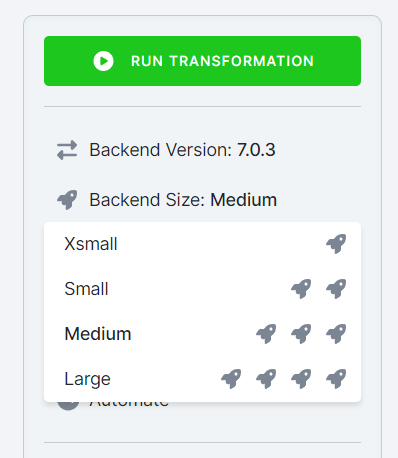
Scaling up the backend size allocates more resources to speed up your transformation.
Example
Section titled “Example”To create a simple Snowflake transformation, follow these steps:
- Create a table in Storage by uploading the sample CSV file.
- Create an input mapping from that table, setting its destination to
source(as expected by the Snowflake script). - Create an output mapping, setting its destination to a new table in your Storage.
- Copy & paste the below script into the transformation code
- Save and run the transformation
CREATE OR REPLACE TABLE "result" AS SELECT "first", "second" * 42 AS "larger_second" FROM "source";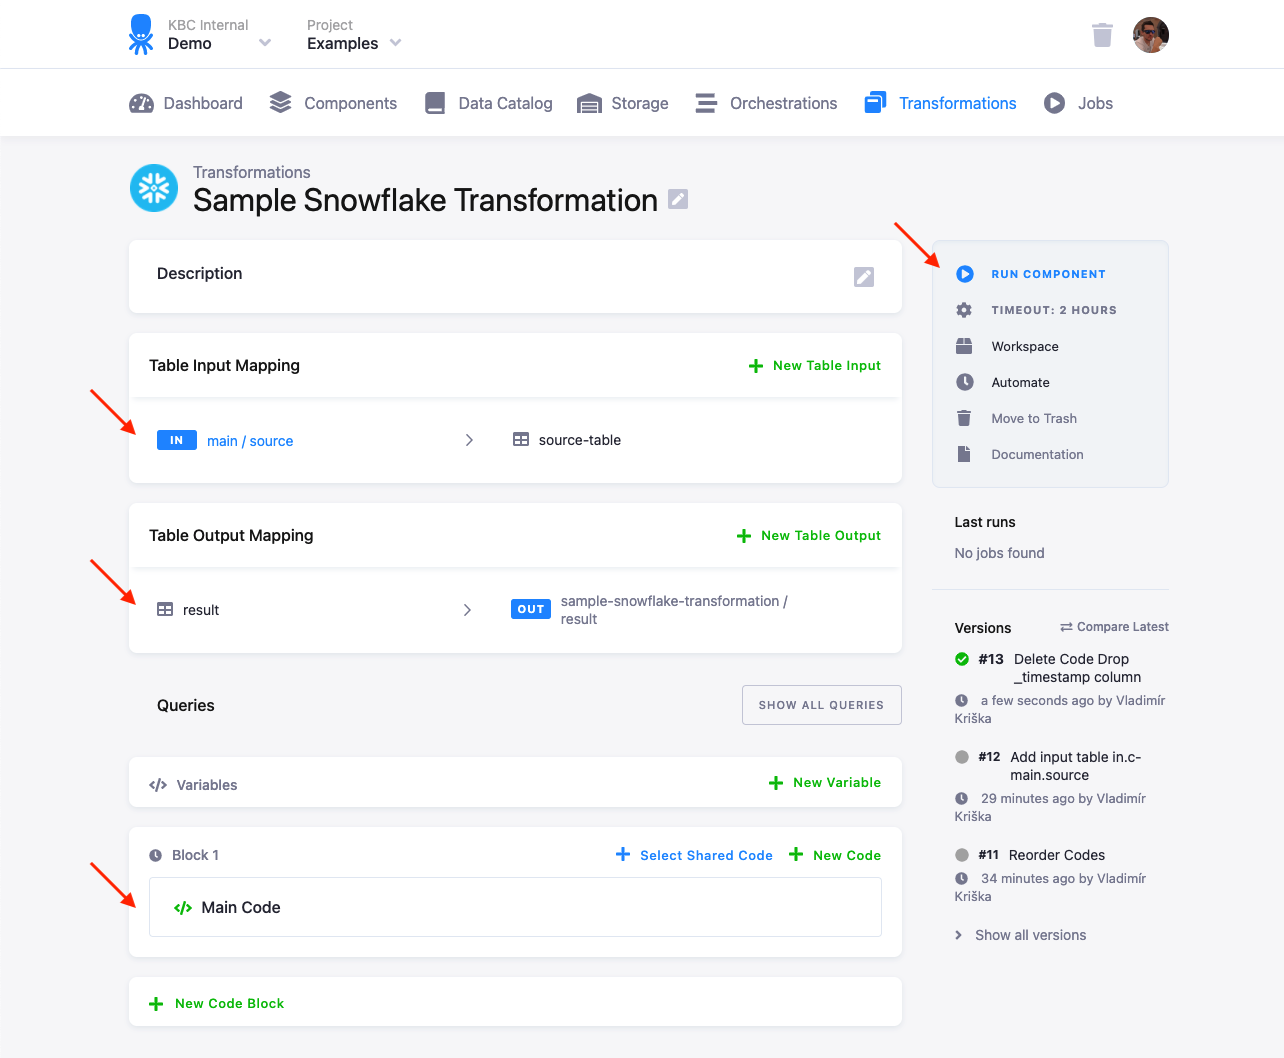
You can organize the script into blocks.
Best Practices
Section titled “Best Practices”Case Sensitivity
Section titled “Case Sensitivity”Snowflake is case sensitive. All unquoted table/column names are converted to upper case while quoted names keep their case.
So, if you want to create the following table,
-- creates table FOOTABLECREATE TABLE footable (...);all of these commands will work
SELECT * FROM FOOTABLE;SELECT * FROM "FOOTABLE";SELECT * FROM footable;while this one will not:
-- table footable not found!SELECT * FROM "footable";Be especially careful when setting up input and output mappings.
When writing your transformation script, quoting all table and column names is highly recommended. Snowflake converts all unquoted table/column identifiers to uppercase, which won’t match table/column identifiers created by Keboola (unless they happen to be all uppercase).
SELECT "barcolumn" FROM "footable";Working With Data Types
Section titled “Working With Data Types”Storage tables store data in character types. When you create a table used on output mapping, you can rely on implicit casting to char:
CREATE OR REPLACE TABLE "test" (ID VARCHAR, TM TIMESTAMP, NUM NUMERIC);
INSERT INTO "test" (ID, TM, NUM)SELECT 'first', CURRENT_TIMESTAMP, 12.5;
Or, you can create the table directly with character columns (and rely on implicit casting to char):
CREATE OR REPLACE TABLE "test" (ID VARCHAR, TM VARCHAR, NUM VARCHAR);
INSERT INTO "test" (ID, TM, NUM)SELECT 'first', CURRENT_TIMESTAMP, 12.5;
You can also explicitly cast the columns to char:
CREATE OR REPLACE TABLE "test" (ID VARCHAR, TM VARCHAR, NUM VARCHAR);
INSERT INTO "test" (ID, TM, NUM)SELECT    TO_CHAR('first'),    TO_CHAR(CURRENT_TIMESTAMP),    TO_CHAR(12.5);
When using an unstructured data type, you always have to use the explicit cast:
CREATE OR REPLACE TABLE "test" (ID VARCHAR, TM VARCHAR, NUM VARCHAR, OBJ VARCHAR);
INSERT INTO "test" (ID, TM, NUM, OBJ)SELECT    'first',    CURRENT_TIMESTAMP,    12.5,    TO_CHAR( --  <- required!        OBJECT_CONSTRUCT(            'NAME','name',            'CIN','123'        )    );
The implicit cast does not work for the ARRAY, OBJECT and VARIANT types, so the following code:
CREATE OR REPLACE TABLE "test" (ID VARCHAR, TM TIMESTAMP, NUM NUMERIC, OBJ OBJECT);
INSERT INTO "test" (ID, TM, NUM, OBJ)SELECT    'first',    CURRENT_TIMESTAMP,    12.5,    OBJECT_CONSTRUCT(        'NAME','name',        'CIN','123'    );
will lead to an error:
Expression type does not match column data type, expecting VARCHAR(16777216) but got OBJECT for column OBJ, SQL state 22000Timestamp Columns
Section titled “Timestamp Columns”By default, Snowflake uses the
YYYY-MM-DD HH24:MI:SS.FF3 format
when converting the timestamp column to a character string.
This means that if you create a table in a transformation that uses a timestamp column,
CREATE TABLE "ts_test" AS (SELECT CURRENT_TIMESTAMP AS "ts");the table value will come out as 2018-04-09 06:43:57.866 -0700 in Storage. If you
want to output it in a different format, you have to cast the column to a string first, for example:
CREATE TABLE "out" AS (SELECT TO_CHAR("ts", 'YYYY-MM-DD HH:MI:SS') AS "ts" FROM "ts_test");Do not use ALTER SESSION queries to modify the default timestamp format, as the loading and unloading sessions are separate
from your transformation/sandbox session and the format may change unexpectedly.
- TIMESTAMP_OUTPUT_FORMAT —
DY, DD MON YYYY HH24:MI:SS TZHTZM - TIMESTAMP_TYPE_MAPPING —
TIMESTAMP_LTZ - TIMESTAMP_DAY_IS_ALWAYS_24H —
yes
SELECT -- yields 2013-03-10 02:12:00.000 +0000 TO_TIMESTAMP_NTZ('10.3.2013 2:12', 'DD.MM.YYYY HH:MI'), -- yields 2013-03-10 03:12:00.000 -0700 TO_TIMESTAMP_TZ('10.3.2013 2:12', 'DD.MM.YYYY HH:MI'), -- yields 2013-03-10 03:12:00.000 -0700 TO_TIMESTAMP('10.3.2013 2:12', 'DD.MM.YYYY HH:MI');Bucket Objects for Read-Only Input Mapping
Section titled “Bucket Objects for Read-Only Input Mapping”For more information on how a read-only input mapping works, visit the link.
Buckets in Snowflake are represented by schemas. You can find all available schemas for your account by calling SHOW SCHEMAS IN ACCOUNT;. Each schema represents a bucket.
Alias tables are materialized as database VIEWs and are accessible via read-only input mappings — including filtered aliases and aliases from linked buckets.
For a linked bucket, the schema is available in another database. That is, to access this linked bucket you have to include the database name of the project from which the bucket is linked.
For example, say your bucket in.c-customers is linked from bucket in.c-crm-extractor in project 123. You then need to reference the tables in the transformation like this: "KEBOOLA_123"."in.c-crm-extractor"."my-table".
When developing the transformation code, it’s easiest to create a workspace with read-only input mappings enabled and look directly in the database to find the correct database and schema names.