Components
In the Keboola platform, most of the data processing functions are implemented in Components. Components are divided into the following categories:
- Data source connectors (formerly known as extractors) – bring data into a Keboola project.
- Data destination connectors (formerly known as writers) – send processed data into a target system.
- Applications – process complex data.
All components, regardless of their category, behave the same way. To use a component, you have to create a configuration first. A configuration sets the necessary parameters for each component (e.g., credentials and other specifications of what to do). Then, it can be run — a job is created and does the actual work.
Component Release Stages
Section titled “Component Release Stages”Our components are released at different stages and labeled to indicate the quality and production readiness level. We strive to deliver the highest-quality components. Our goal is to unlock as many interesting integrations as possible, benefiting all our customers. The component release grades allow us to manage the release process effectively and align expectations accurately.
| Experimental | Beta | Production (GA) | |
|---|---|---|---|
| Availability | Available either in the UI or per request | Listed in the official component list and available to all customers | Listed in the official component list and available to all customers |
| Support & SLA | No or limited SLA | Officially supported by Keboola’s Standard SLA – in active development | Officially supported by Keboola’s Standard SLA |
| Production-ready | Functional, but only for limited use cases Experimental component, not advisable for business-critical processes May not ever move to Beta/GA | Yes – with limitations Will eventually move to GA (e.g., still in the process of fine-tuning, tested on fewer production use cases, may contain less robust documentation) | Yes Stable version, tested on many production use cases Fully documented |
| Updates & Maintenance | Breaking changes may be introduced (It is still possible to fix certain versions to avoid BC issues) Maintenance may end at any time → may be deprecated | Monitored via standard processes Always backward-compatible changes In active development | Monitored via standard processes Always backward-compatible changes, announced via standard channels |
Production (GA)
Section titled “Production (GA)”This version is stable and has been well-tested by numerous customers in many production scenarios. GA (General Availability) versions feature comprehensive documentation and components with a low error rate, making them suitable for mission-critical production use cases.
All potential updates to the component are guaranteed to be backward compatible.
Components are available to all customers. These components are usually early additions and may still be in rapid development.
All changes are backward compatible.
Limitations
Section titled “Limitations”- Because in the early stages, these components are used in fewer projects. Minor bugs, though promptly fixed within the standard SLA, may appear more frequently.
- The range of features might not be exhaustive and will likely expand through backward-compatible updates.
- Documentation may be less comprehensive than in the GA version, often given as README.md files.
- These components may pose limitations, like pending Google verification, verification status-related rate limits, etc.
Experimental
Section titled “Experimental”Developed for specific use cases but not tested in various scenarios, these highly experimental components are functional. When used in untested scenarios, they may contain undiscovered bugs and impose other limitations, such as rate limiting, reliance on less stable proprietary libraries, dependency on the source website structure (scraping), and others.
Experimental components may not progress to the Beta and GA stages.
Nevertheless, these components can address obscure use cases and deliver unique integrations. Their code is public so they can serve as a foundation for custom forks, including Generic Extractor configurations.
Many of these components also serve our internal purposes, and we decided to share them publicly to benefit our community.
Private / Unlisted
Section titled “Private / Unlisted”Some components are still unlisted for various reasons. Each stack’s full list of components is accessible via the public Storage API index call. Many of these are 3rd-party components. Users can add these components via their ID, but we cannot guarantee their functionality.
We may share our pre-release versions that exist in private Beta with our test user groups. In such a case, you will receive a component ID, which you can use to create the configuration. These components will eventually transition to a public Beta.
Creating Component Configuration
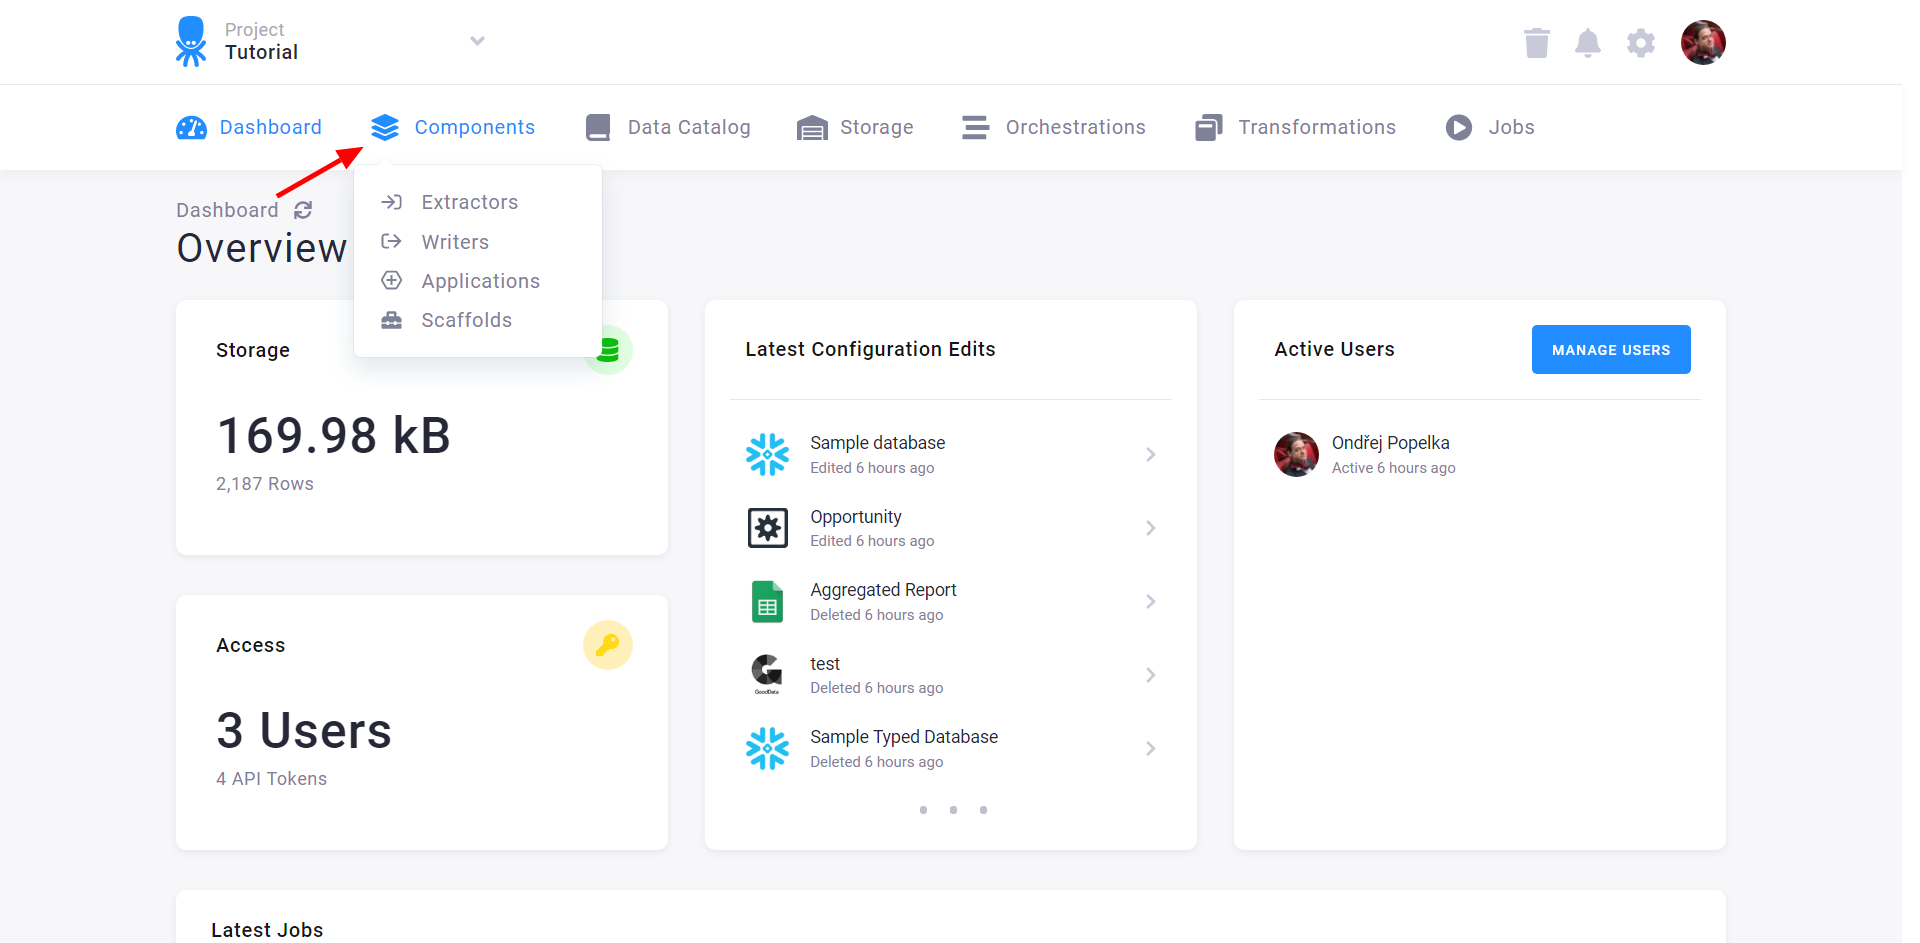
Section titled “Creating Component Configuration”To create a new component configuration, select Components from the top navigation and then select one of the component categories:
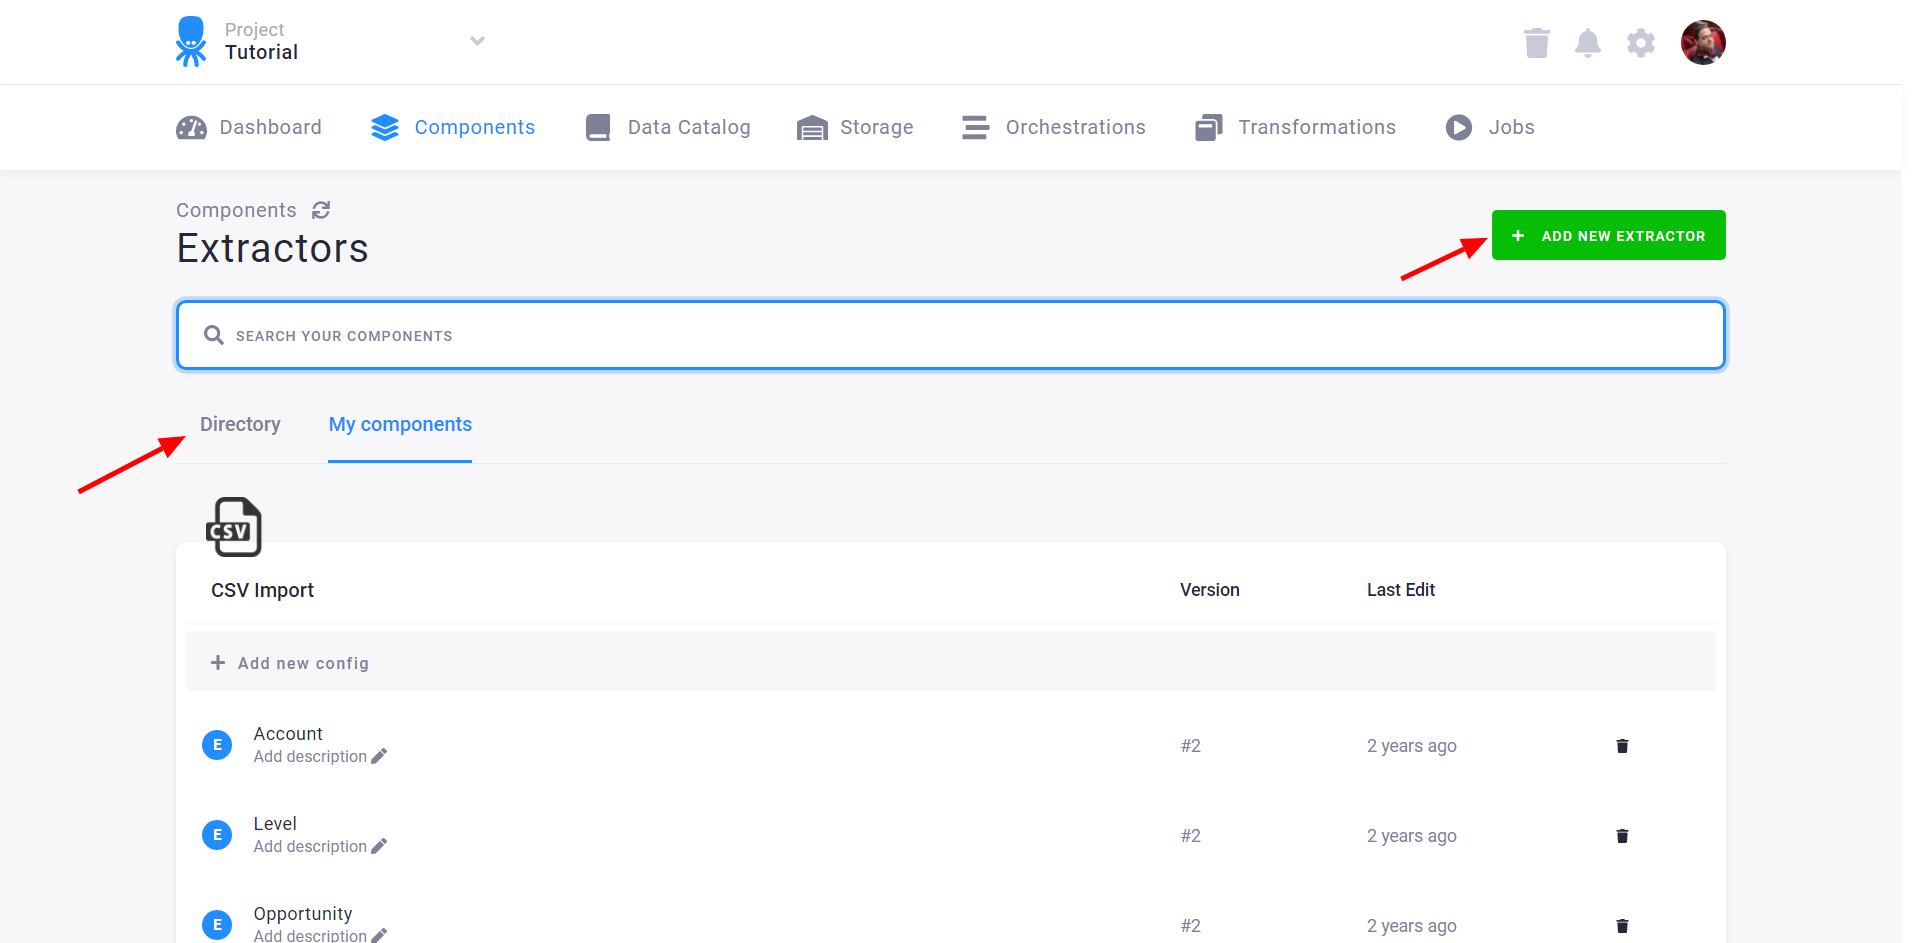
The following page lists the project’s current configurations (e.g., data source connectors). To create a new configuration of a new component, use the Directory or the Add New Data Source button.
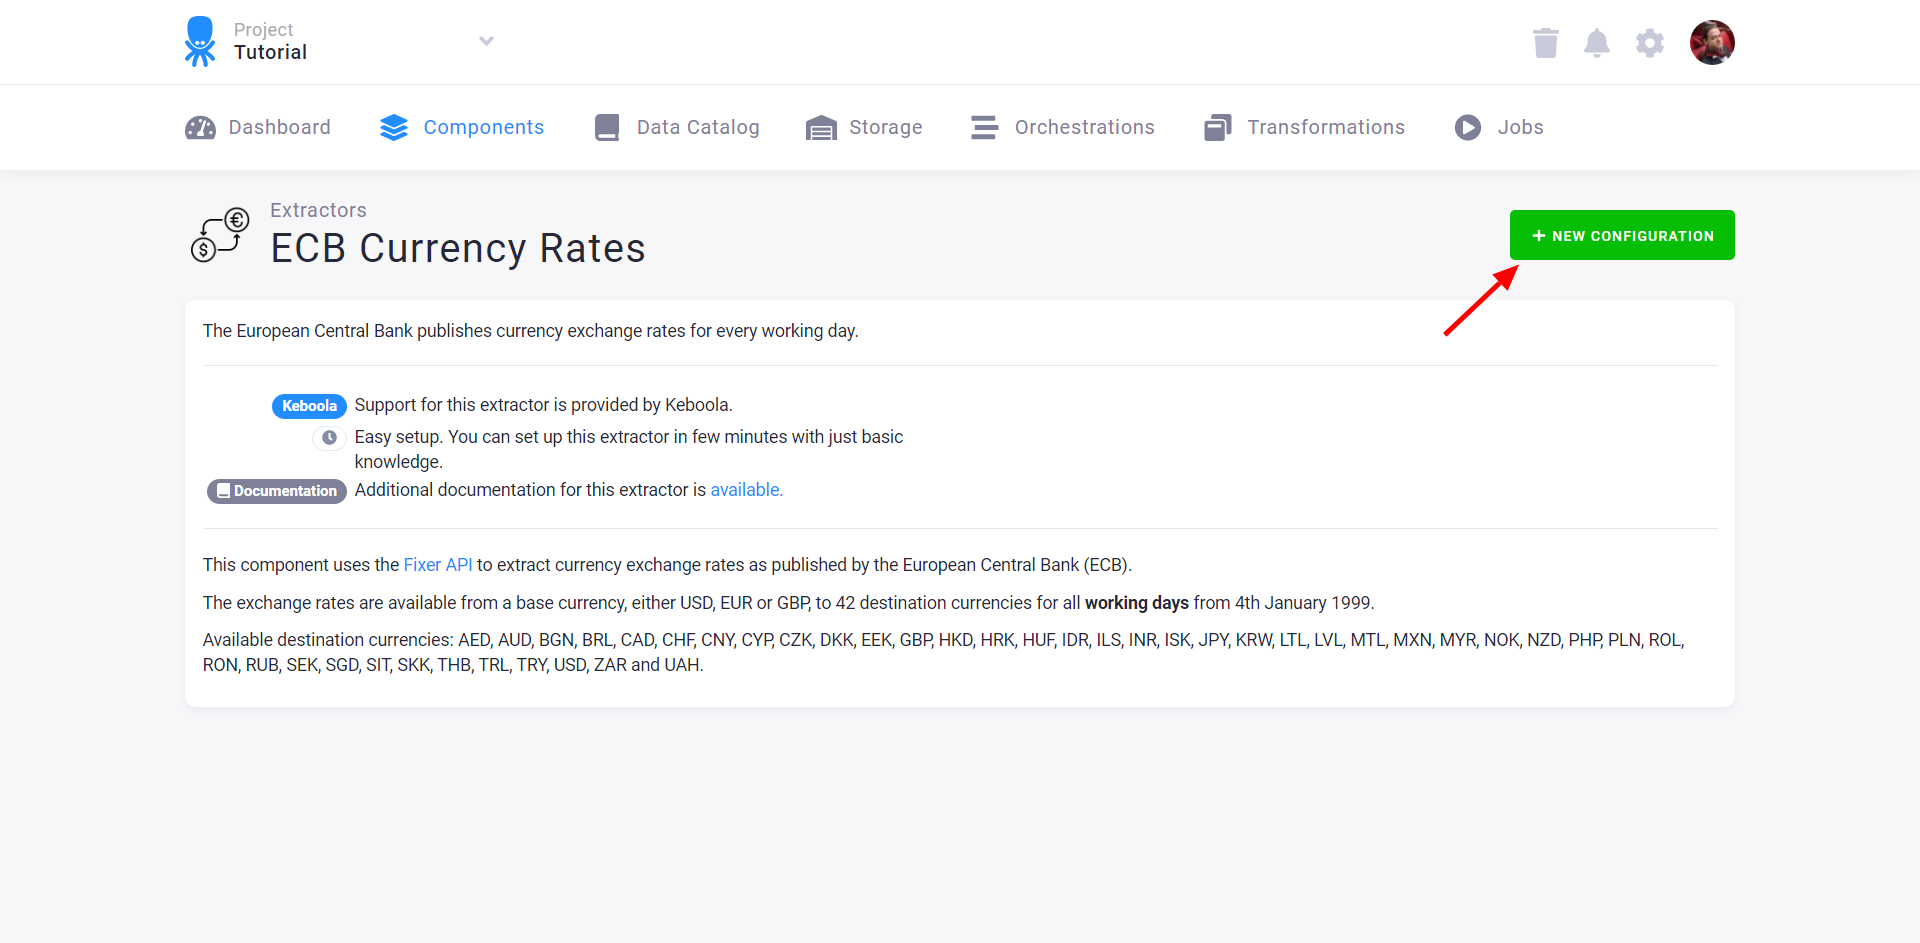
Use the search field to find the component you want to use (the Currency Rates data source connector in this case) and then click the component tile to add it:

The following page describes what the component does in detail and allows you to create a new configuration using the New Configuration button.
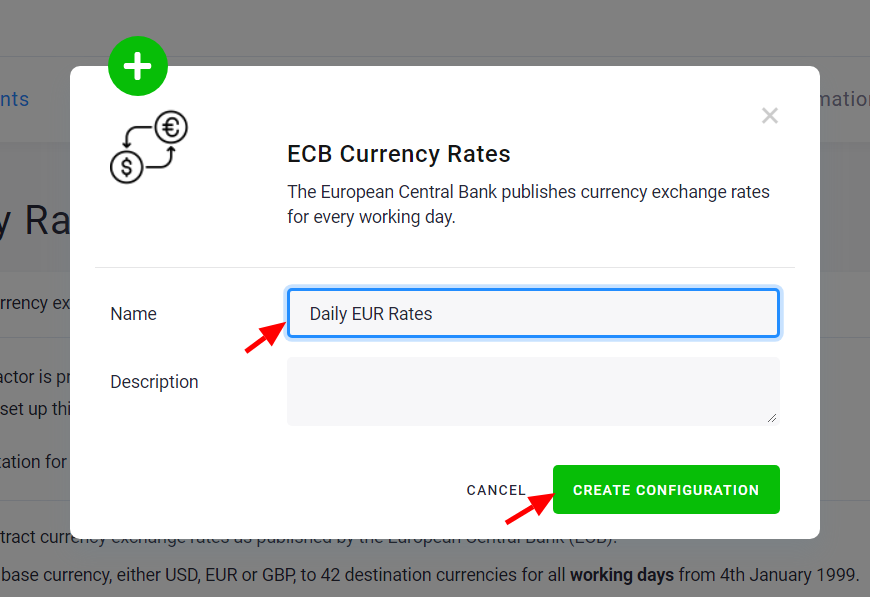
In the dialog, enter a name for the configuration. The name is unimportant if a component has a single configuration in your project. However, the names should meaningfully distinguish one configuration from another for components with multiple configurations (e.g., configured with different credentials).
The next page shows a form for configuring the component, this varies heavily between different components. Component configuration can range from trivial (as in the Currency Rates data source connector) to very complex ones (e.g., Google Ads data source connector). The configuration complexity badge shown in the component list gives you a rough idea of what to expect.
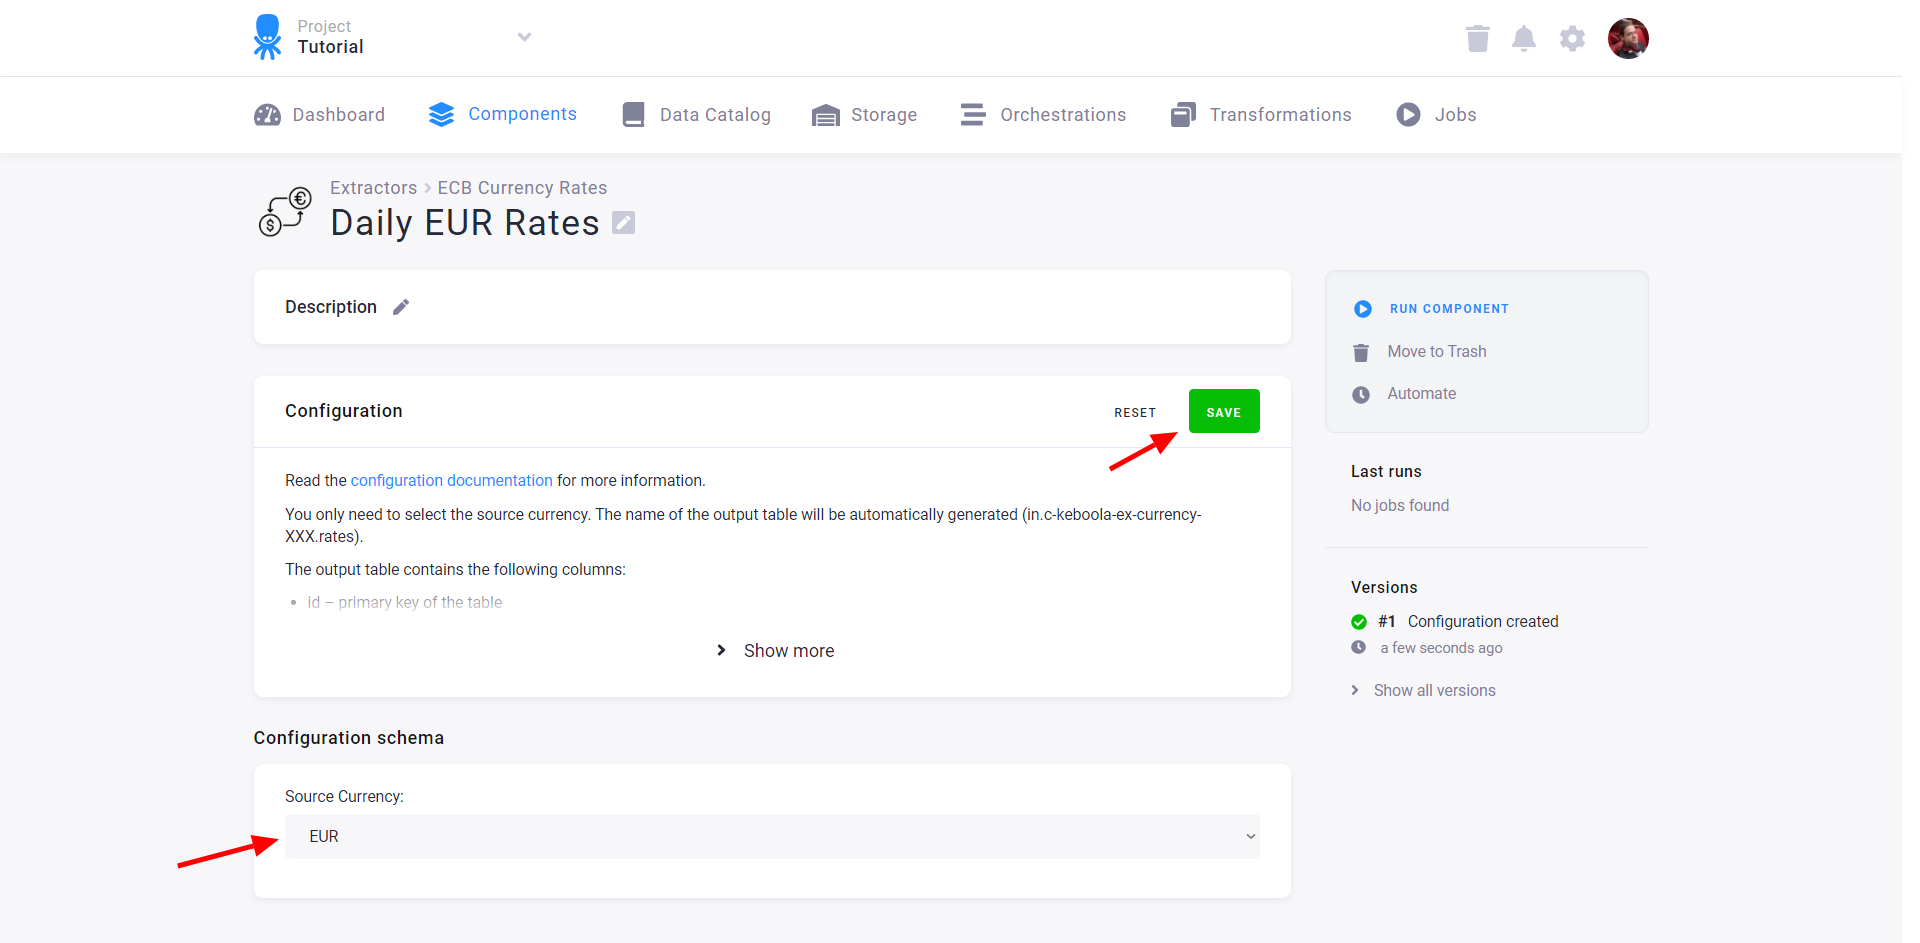
When you set the parameters and Save them, you can run the component using the Run Component button:
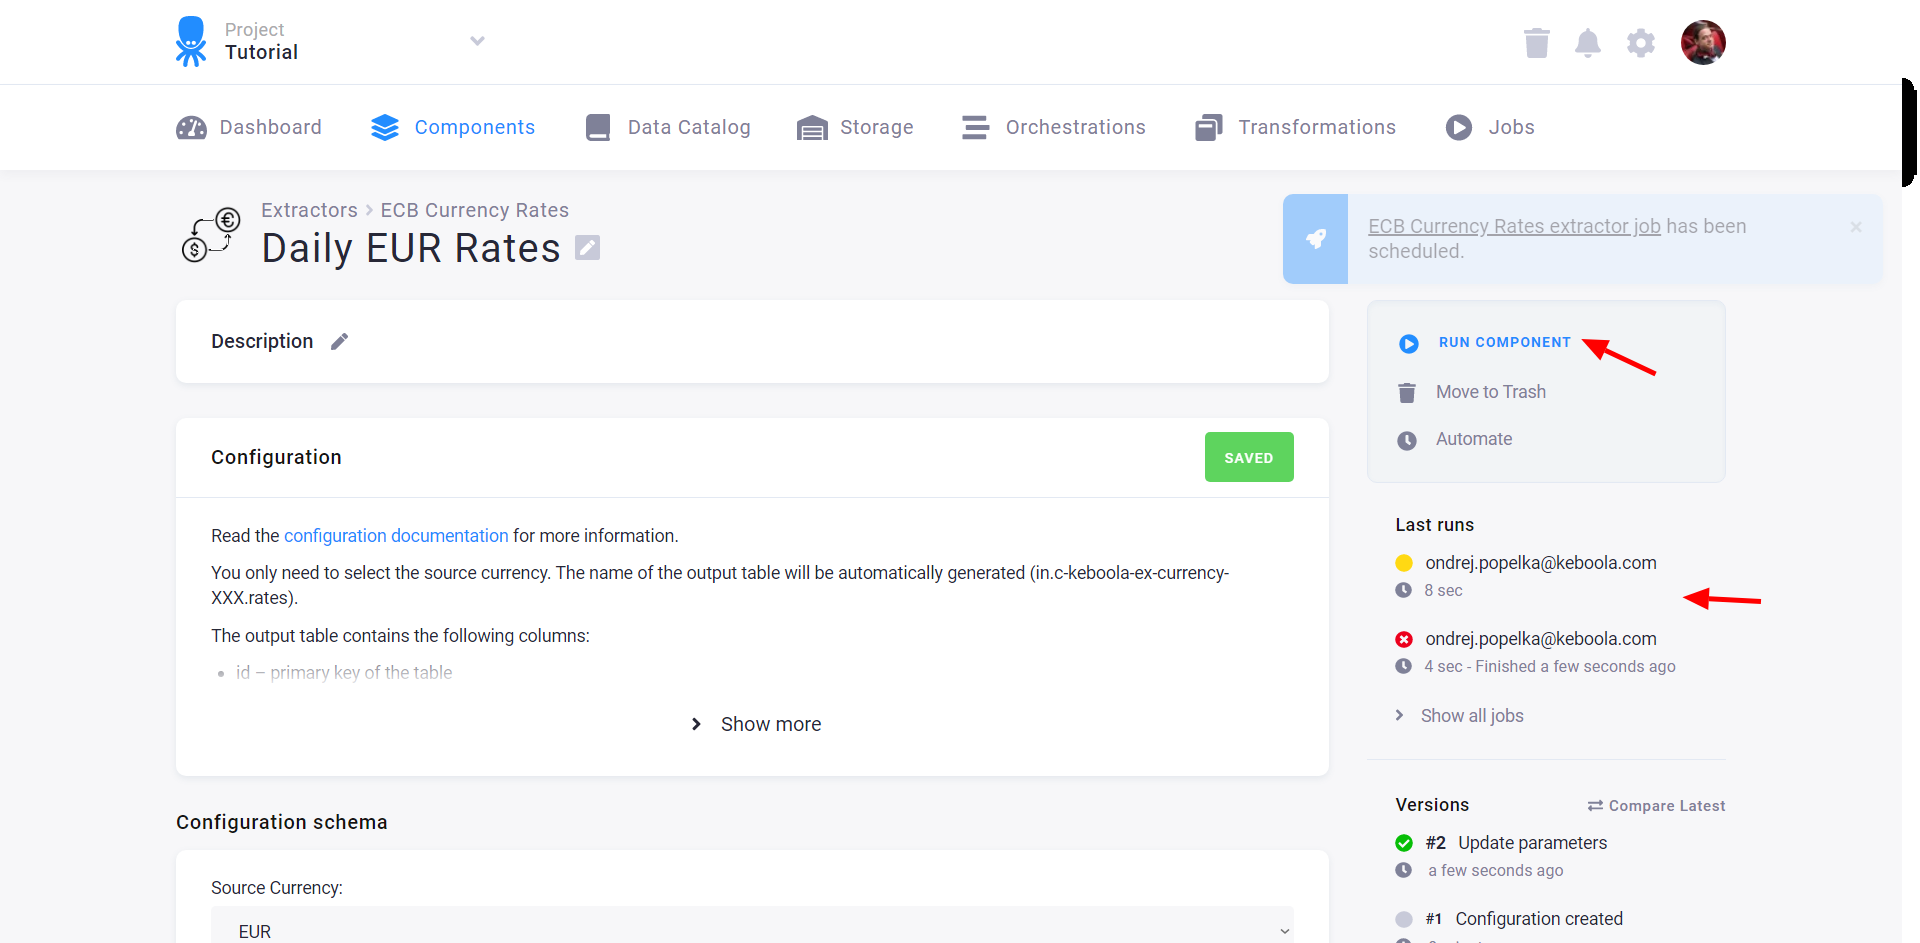
When you run a component, a job is created and subsequently executed. The right panel shows the last executed jobs with an indication of their status:
- Yellow – Running
- Red – Failed
- Green – Successful
You can click each job to view its details, including the tables it reads from your project and the tables it produced in your project. Its active version (the one with the green tick mark) will be used when running the configuration.
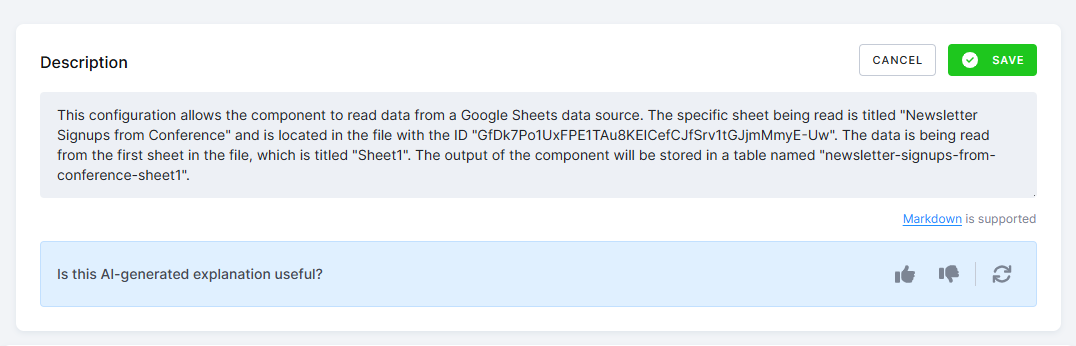
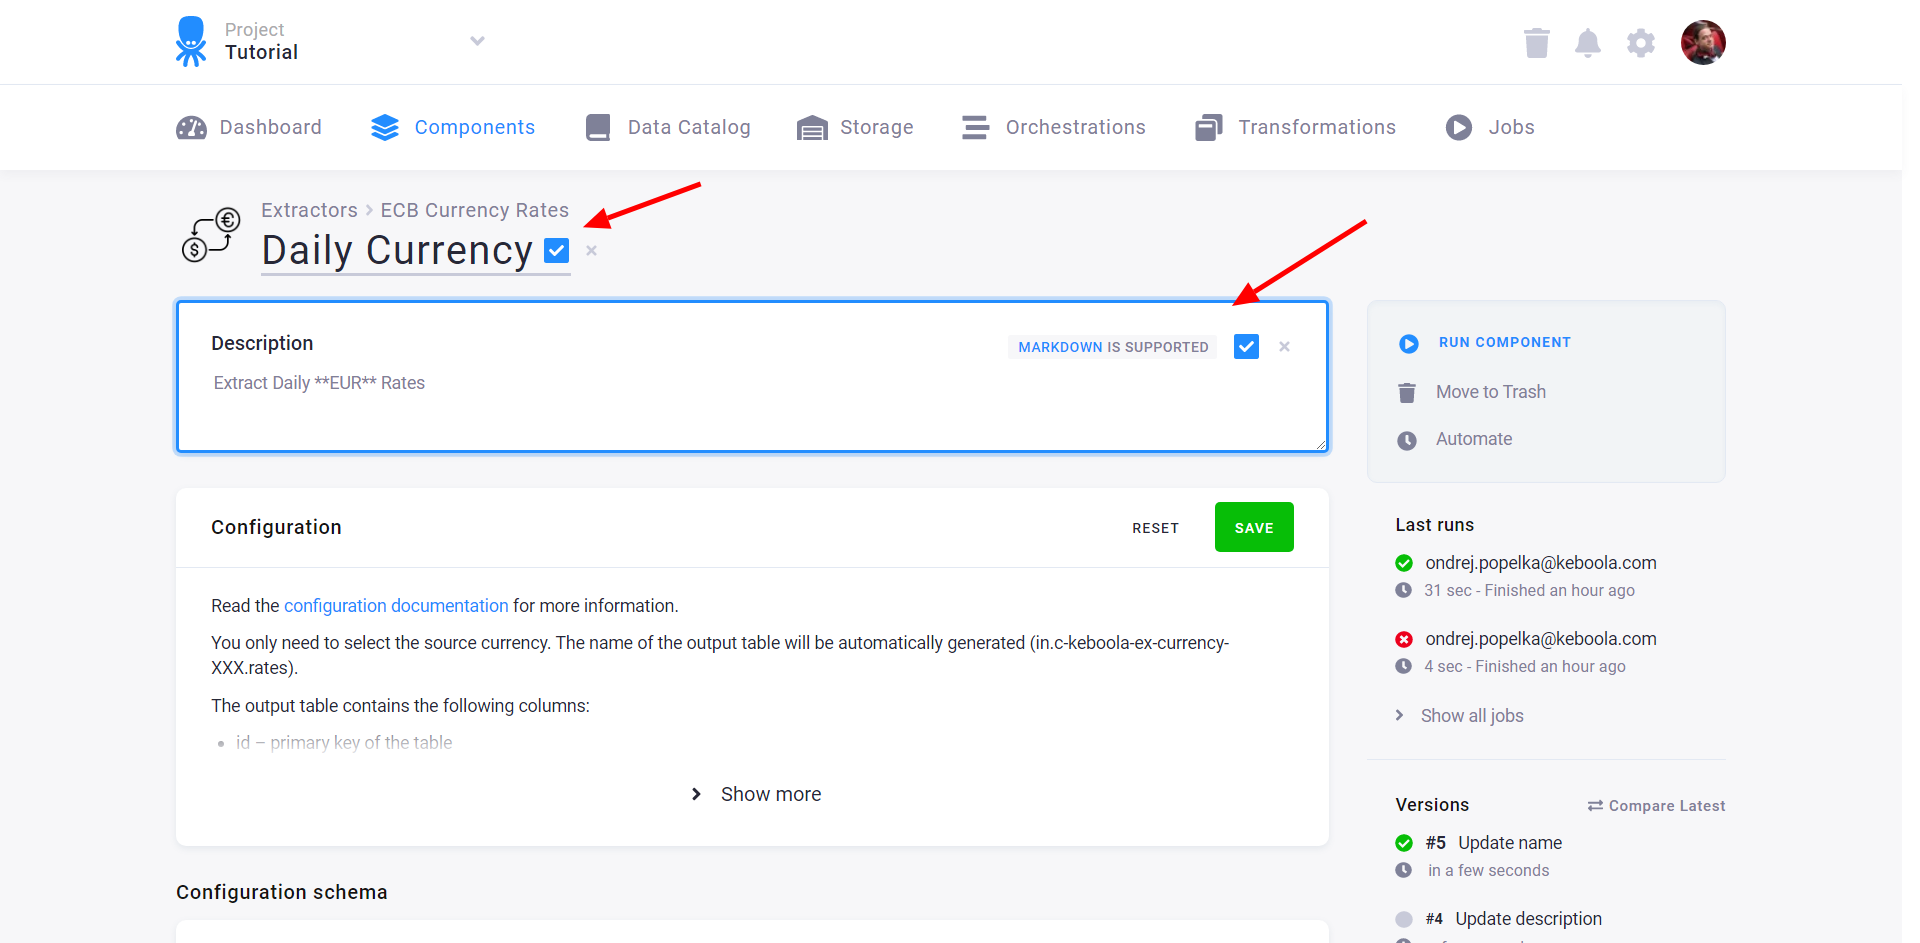
Configuration Description
Section titled “Configuration Description”After configuring the component, it is a good practice to describe what it does.
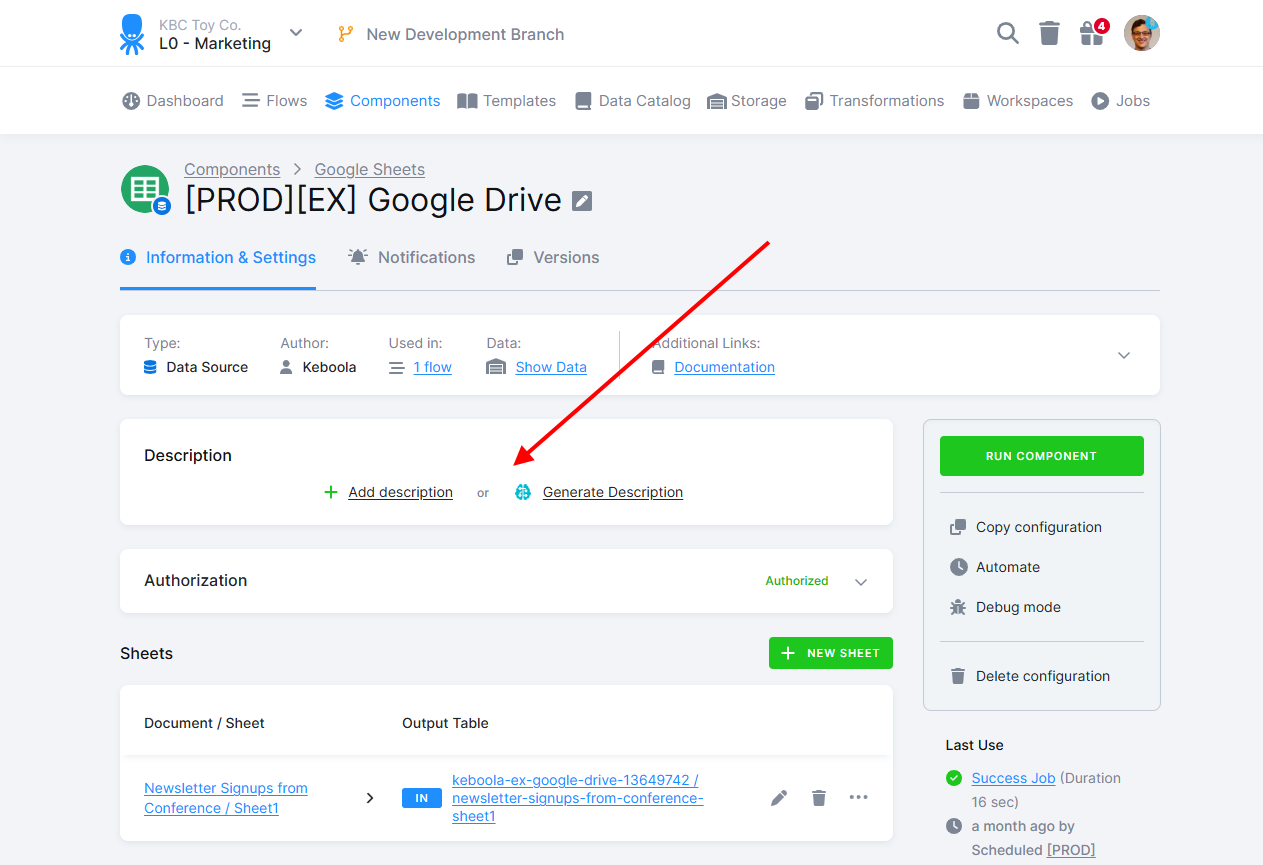
Click the Add description button to write the description manually. You can also click the Generate description button to have our AI service write a suggestion for you that you can modify. Note that the configuration will be sent to the Microsoft Azure OpenAI service when using the AI service. Even though the contents are not used to train the model, as a best practice, you should not store unencrypted secrets such as API keys and passwords in the configuration (for example, in Python transformation code). Variables and encrypted configuration parameters are automatically obfuscated.
Configuration Versions
Section titled “Configuration Versions”Configuration parameters can be changed at any time. Every change to a configuration is recorded in the history of versions. You can also change the configuration’s name and description at any time. The configuration description supports rich text formatting using Markdown.
The bottom right panel shows a list of the configuration versions. Use the list to
- copy any version.
- compare any two successive versions.
- roll back to an older version.
All of the operations can be accessed via an API. The developer guide explains how to work with configurations.
The version list is unlimited. Configuration versions are also created when the configurations are manipulated programmatically using the API. In other words, all configuration modifications are recorded.
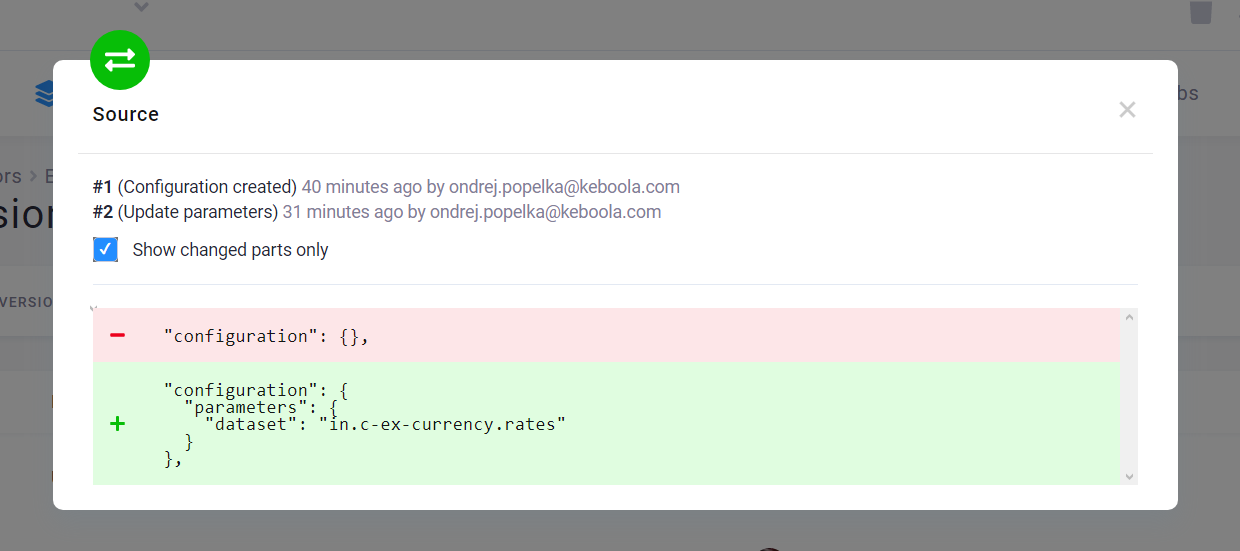
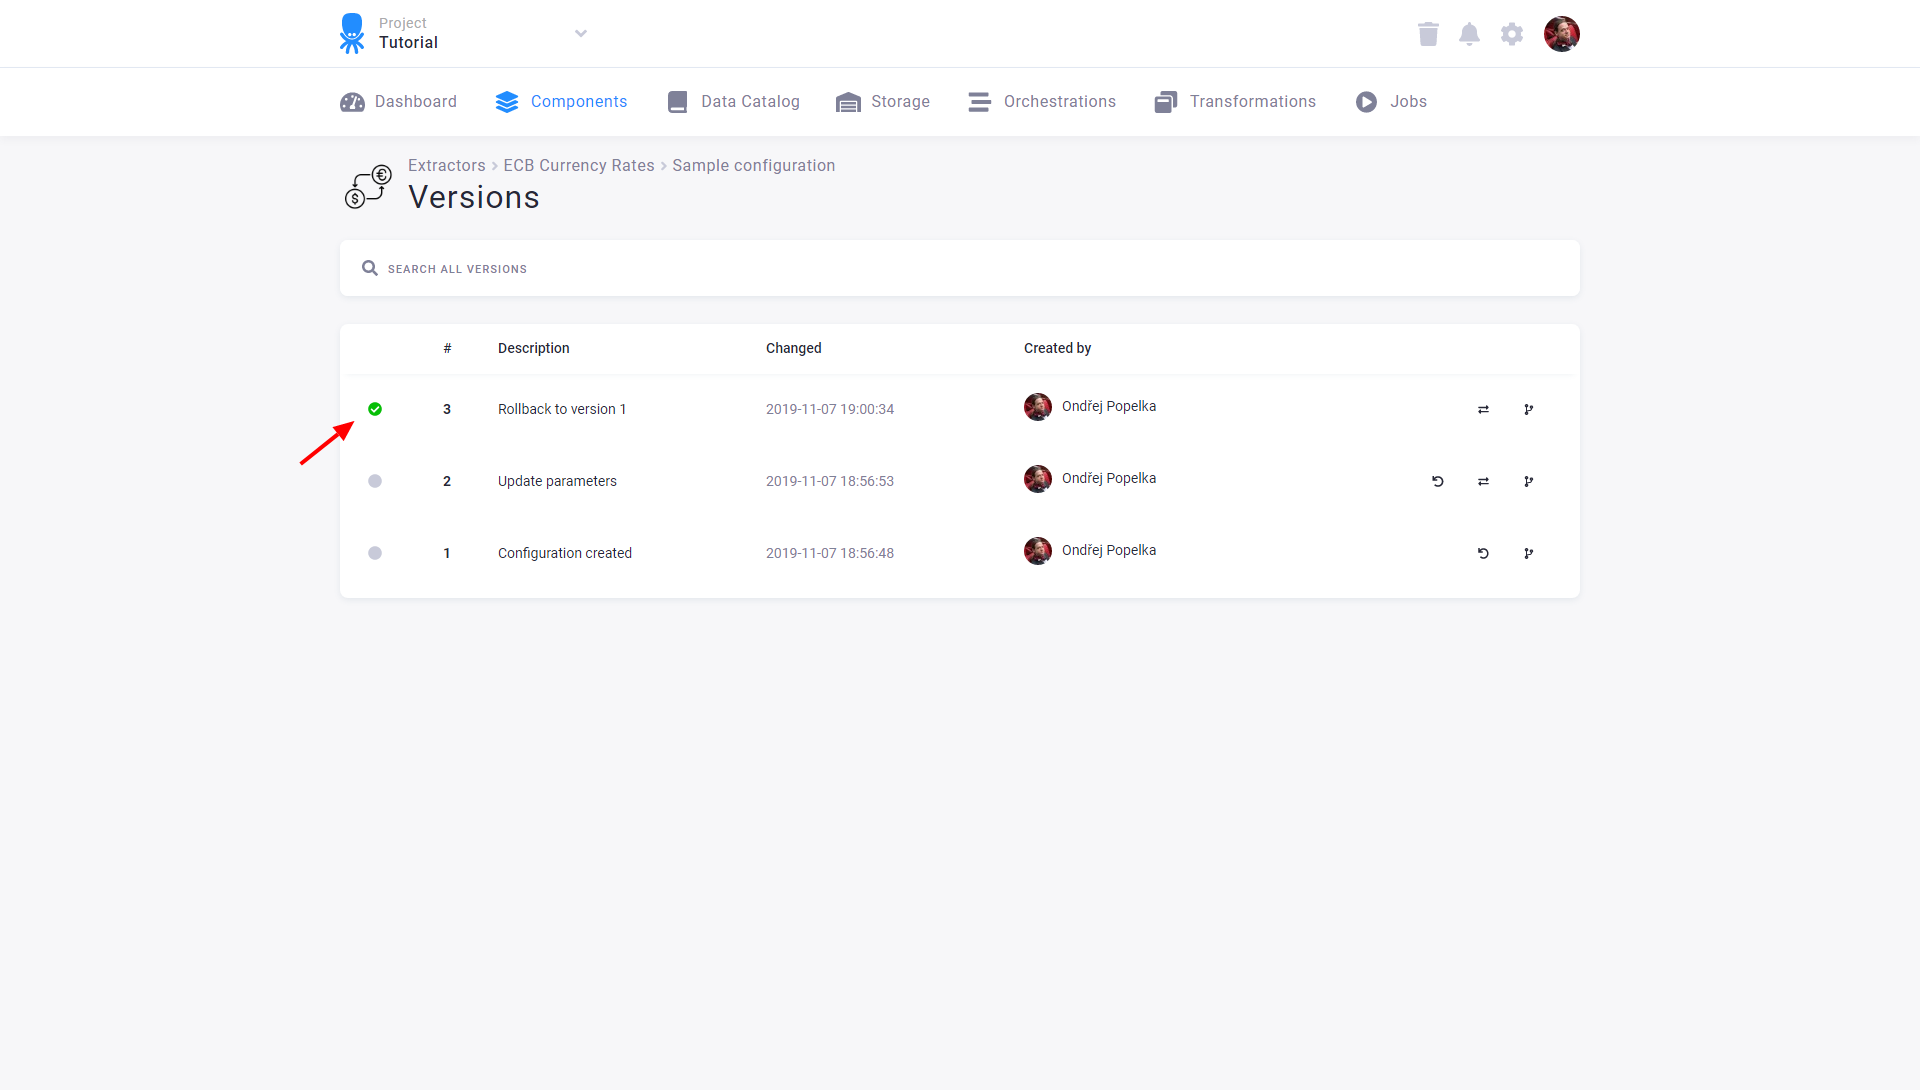
Compare Versions
Section titled “Compare Versions”You can compare adjacent versions by clicking the compare icon:

The differences between the raw JSON configurations are displayed when you compare the two versions.
When you roll back a configuration, a new version is created. This means you never lose any version of a configuration, and there is always an option to get back to it. Configuration versions are also created when the configurations are manipulated programmatically via the API.
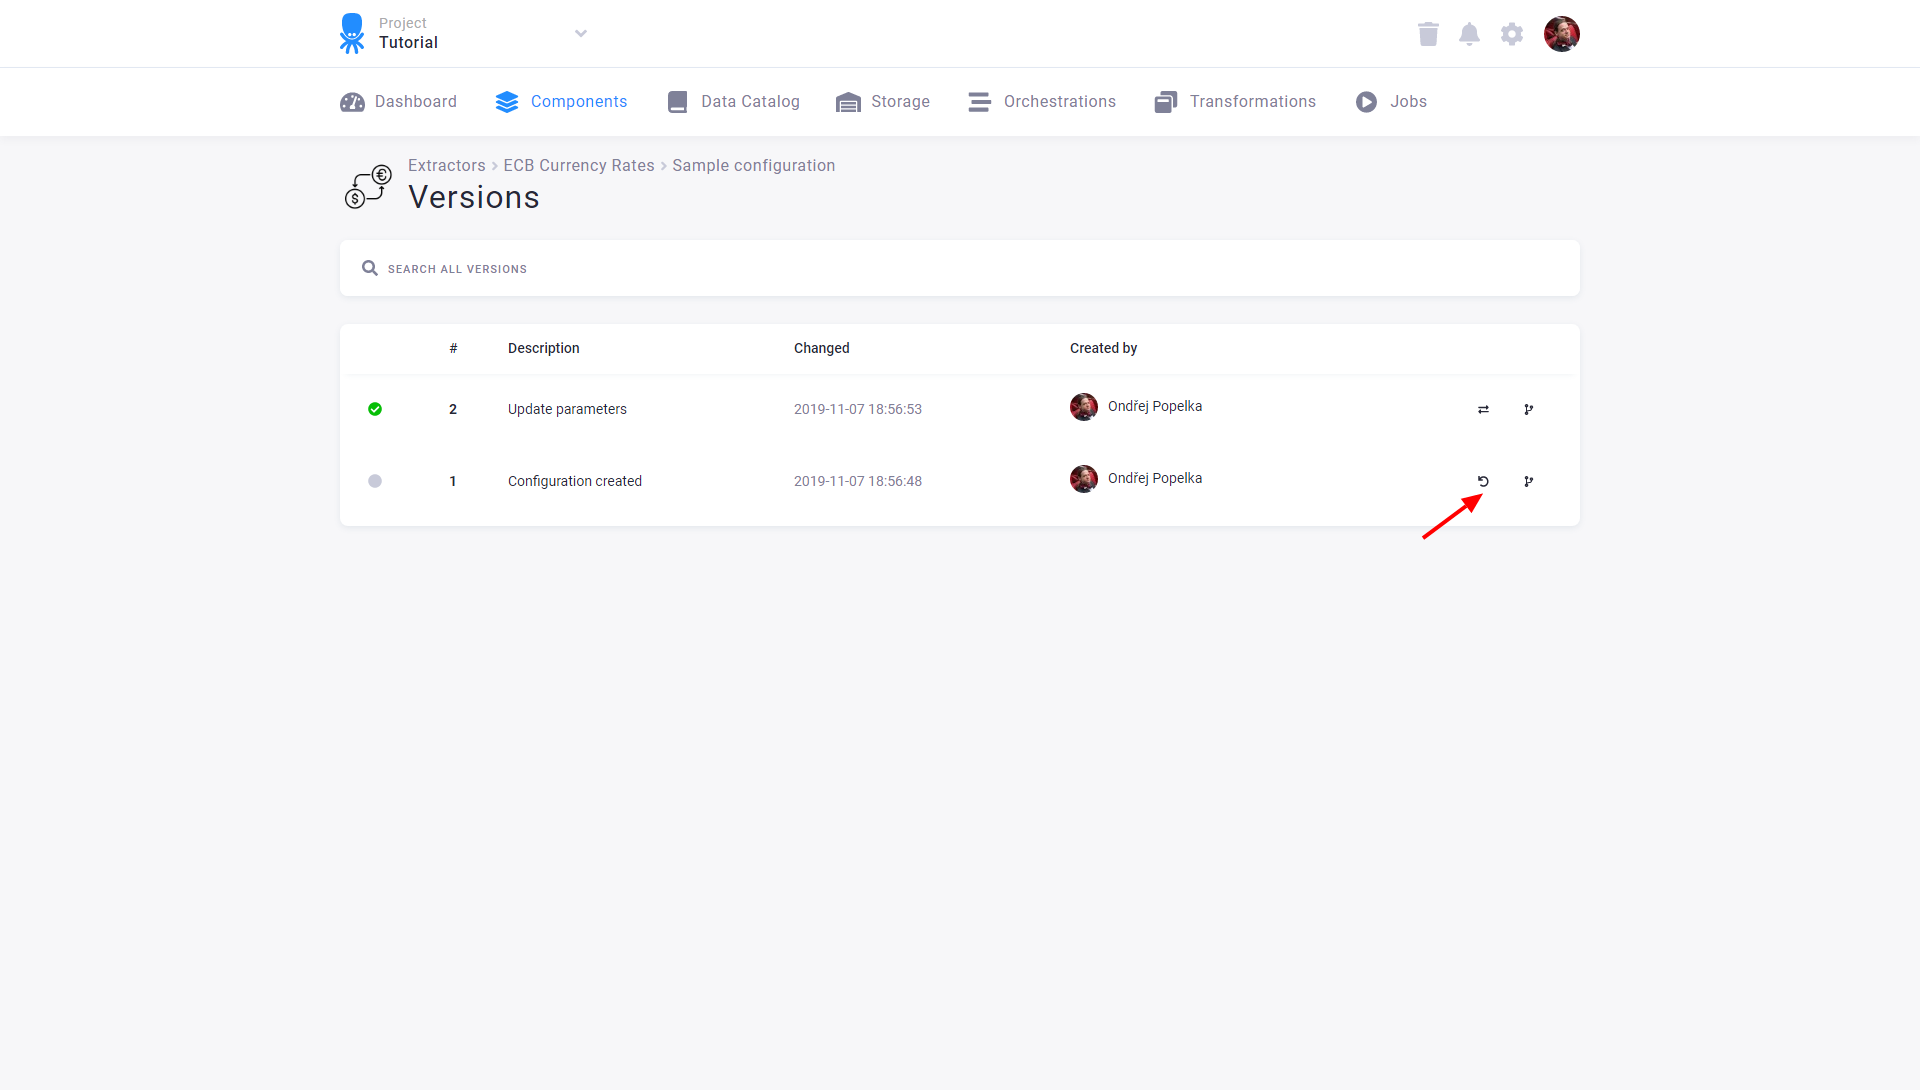
Rollback Version
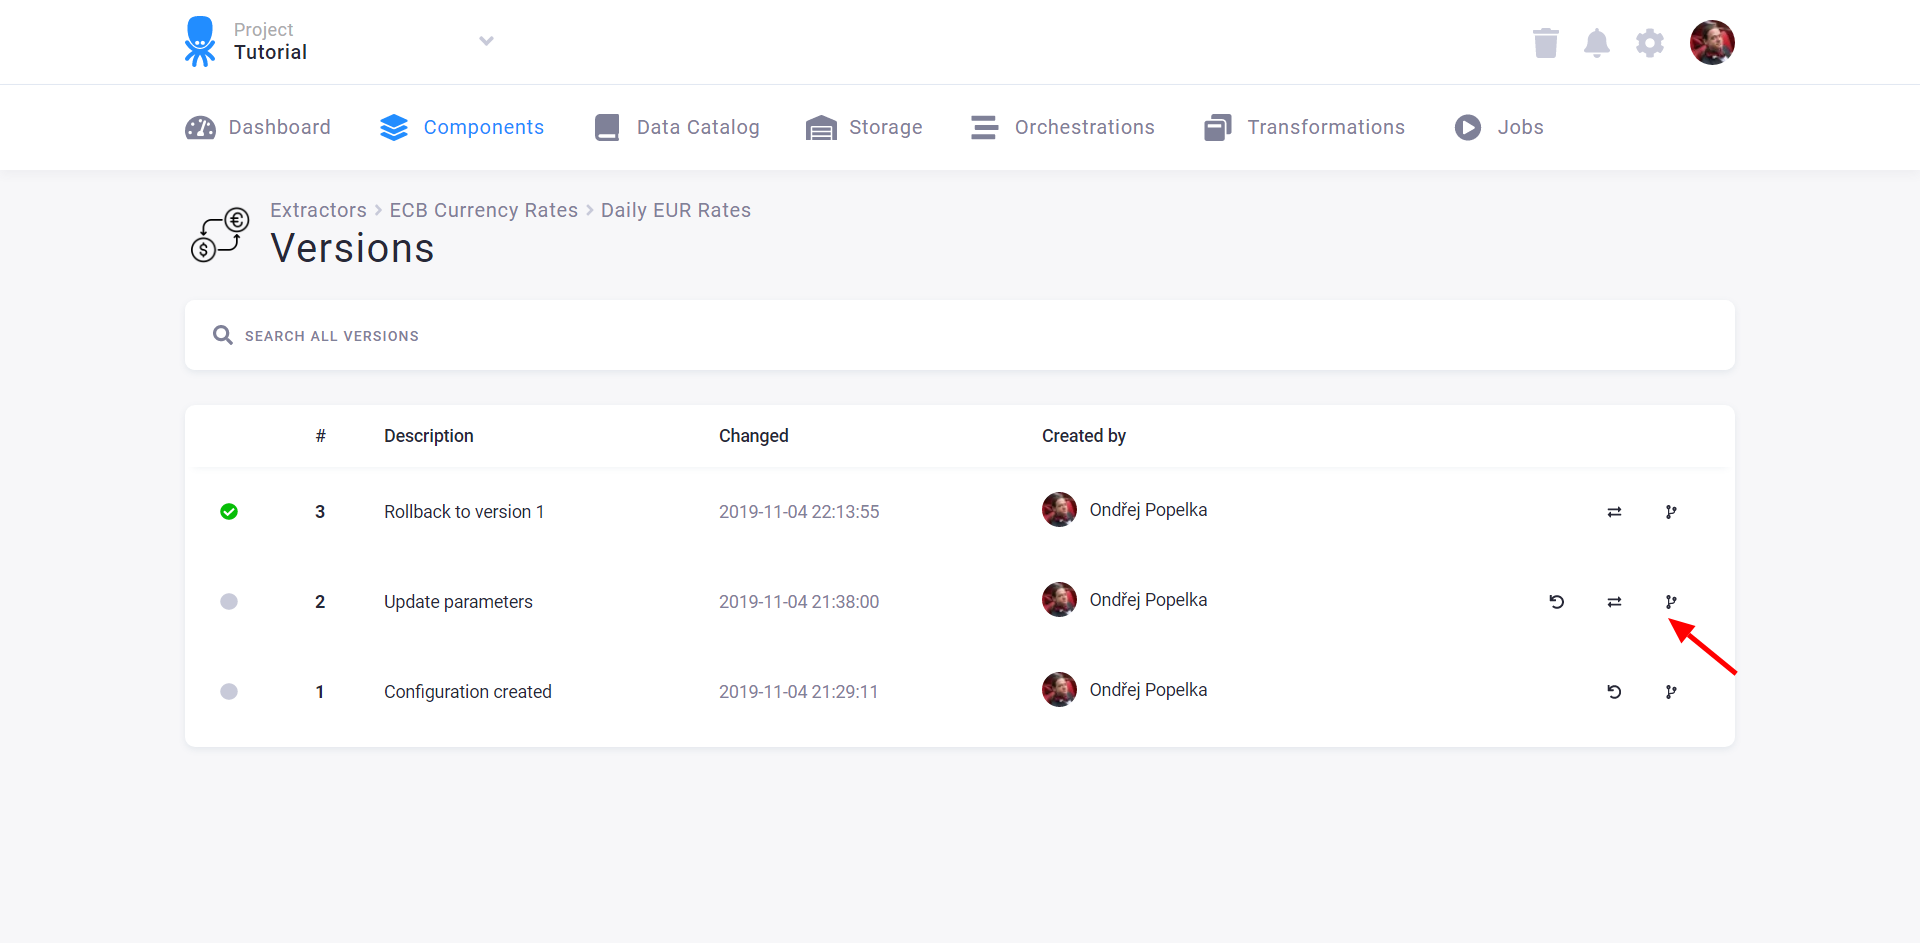
Section titled “Rollback Version”If you need to return to an older version of the configuration, you can also roll back to it (the other option is to make its copy). Rolling back a configuration version means that a new configuration version is created (and marked as active) with the contents of the selected version. A rollback is, therefore, quite a safe operation.
Click the *rollback icon next to the version you want to return to:
Confirm the rollback and see the result:
Copy Configuration
Section titled “Copy Configuration”You can also use the version list to create a copy of the configuration:
You can customize the name of the configuration copy:
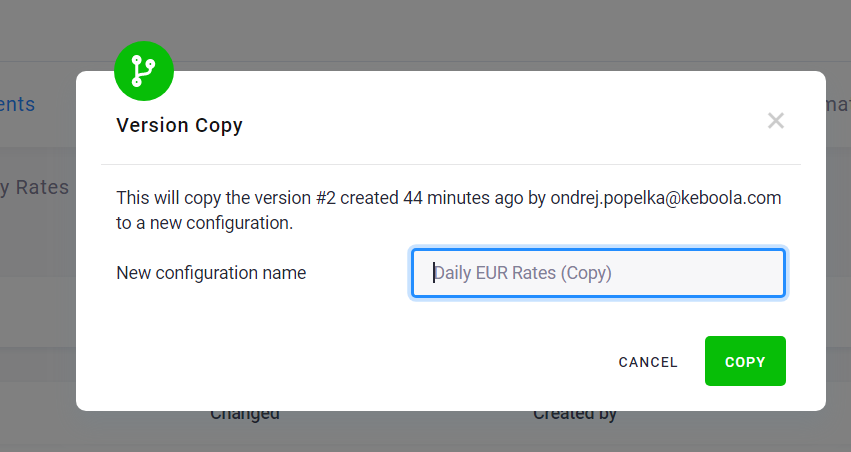
The copy of the configuration is created as a new isolated configuration—i.e., there is no link between the original configuration and the copy, and changes to one have no effect on the other. The new configuration is completely independent of the old one. You may modify or delete either of them without affecting the other one.
Delete Configuration
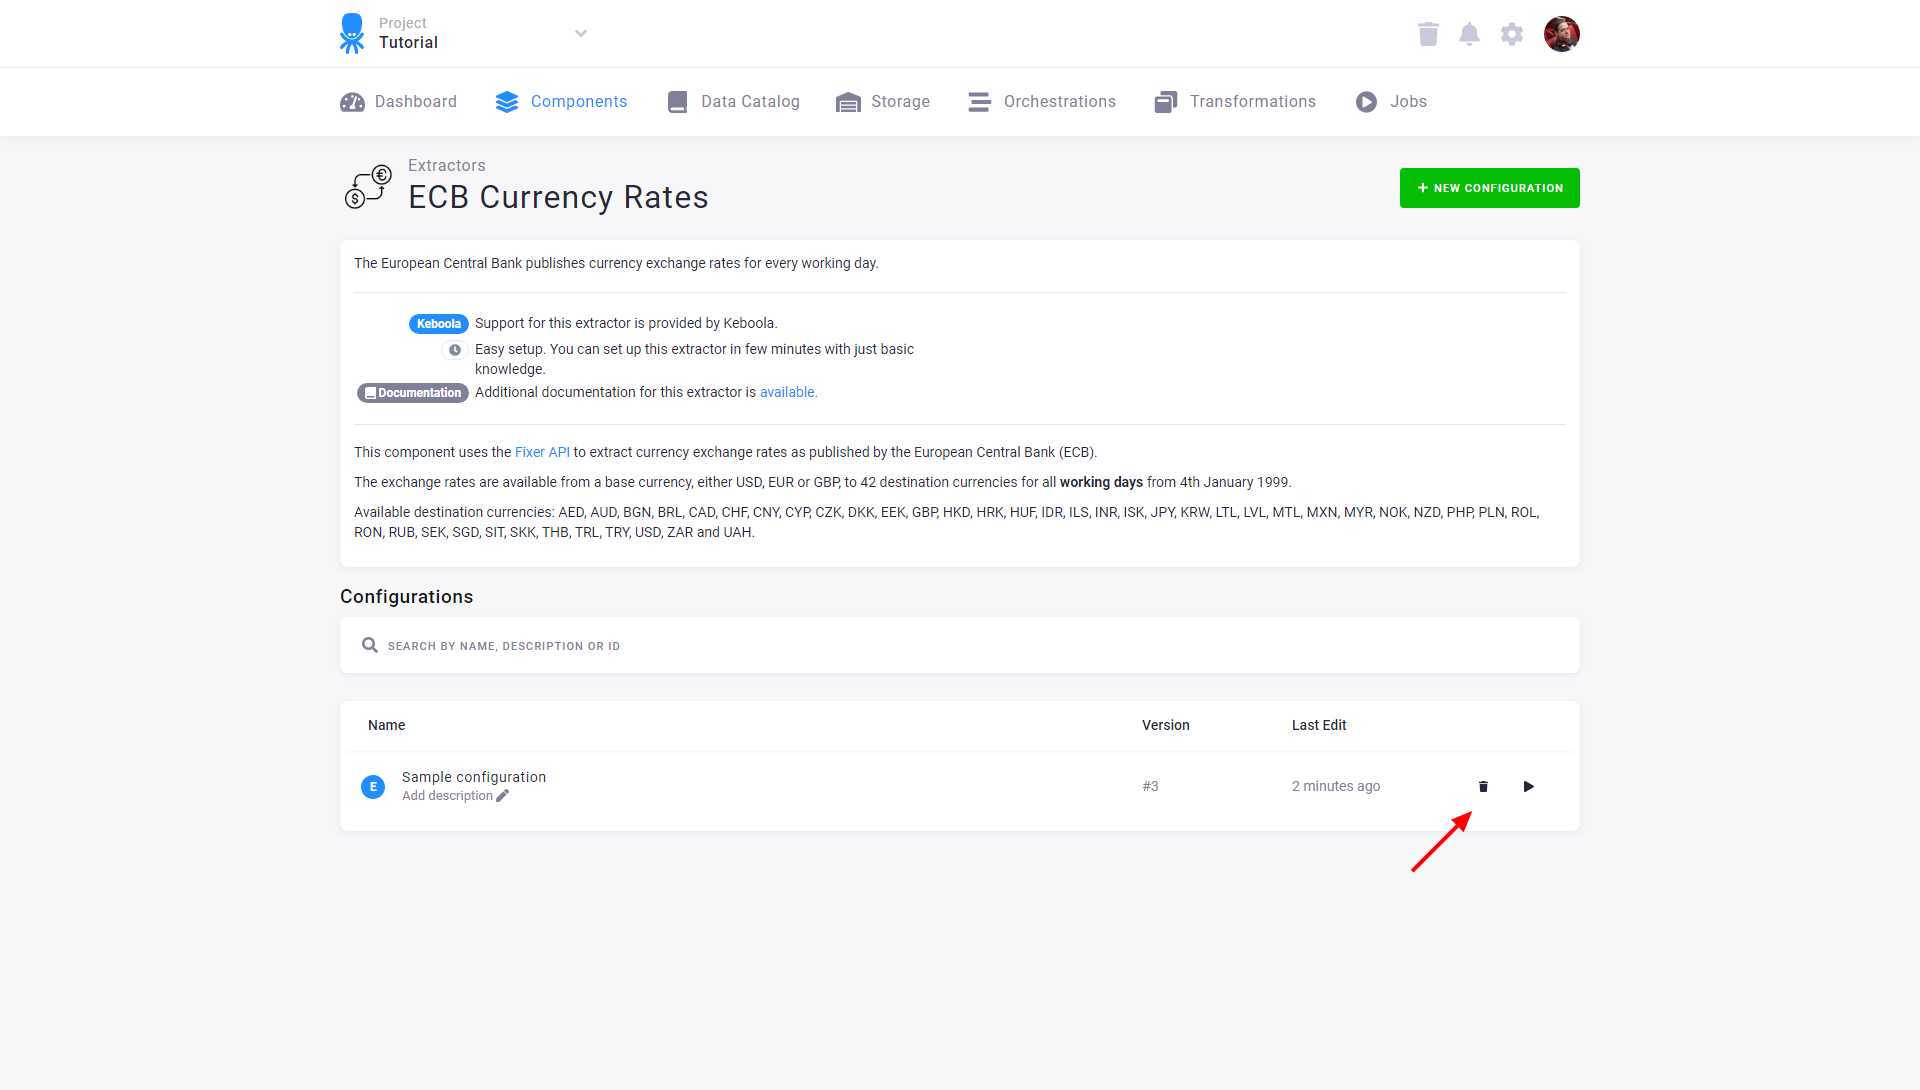
Section titled “Delete Configuration”To delete and move a configuration to Trash, click the bin icon in the configuration list or the Move to Trash button in the configuration detail.
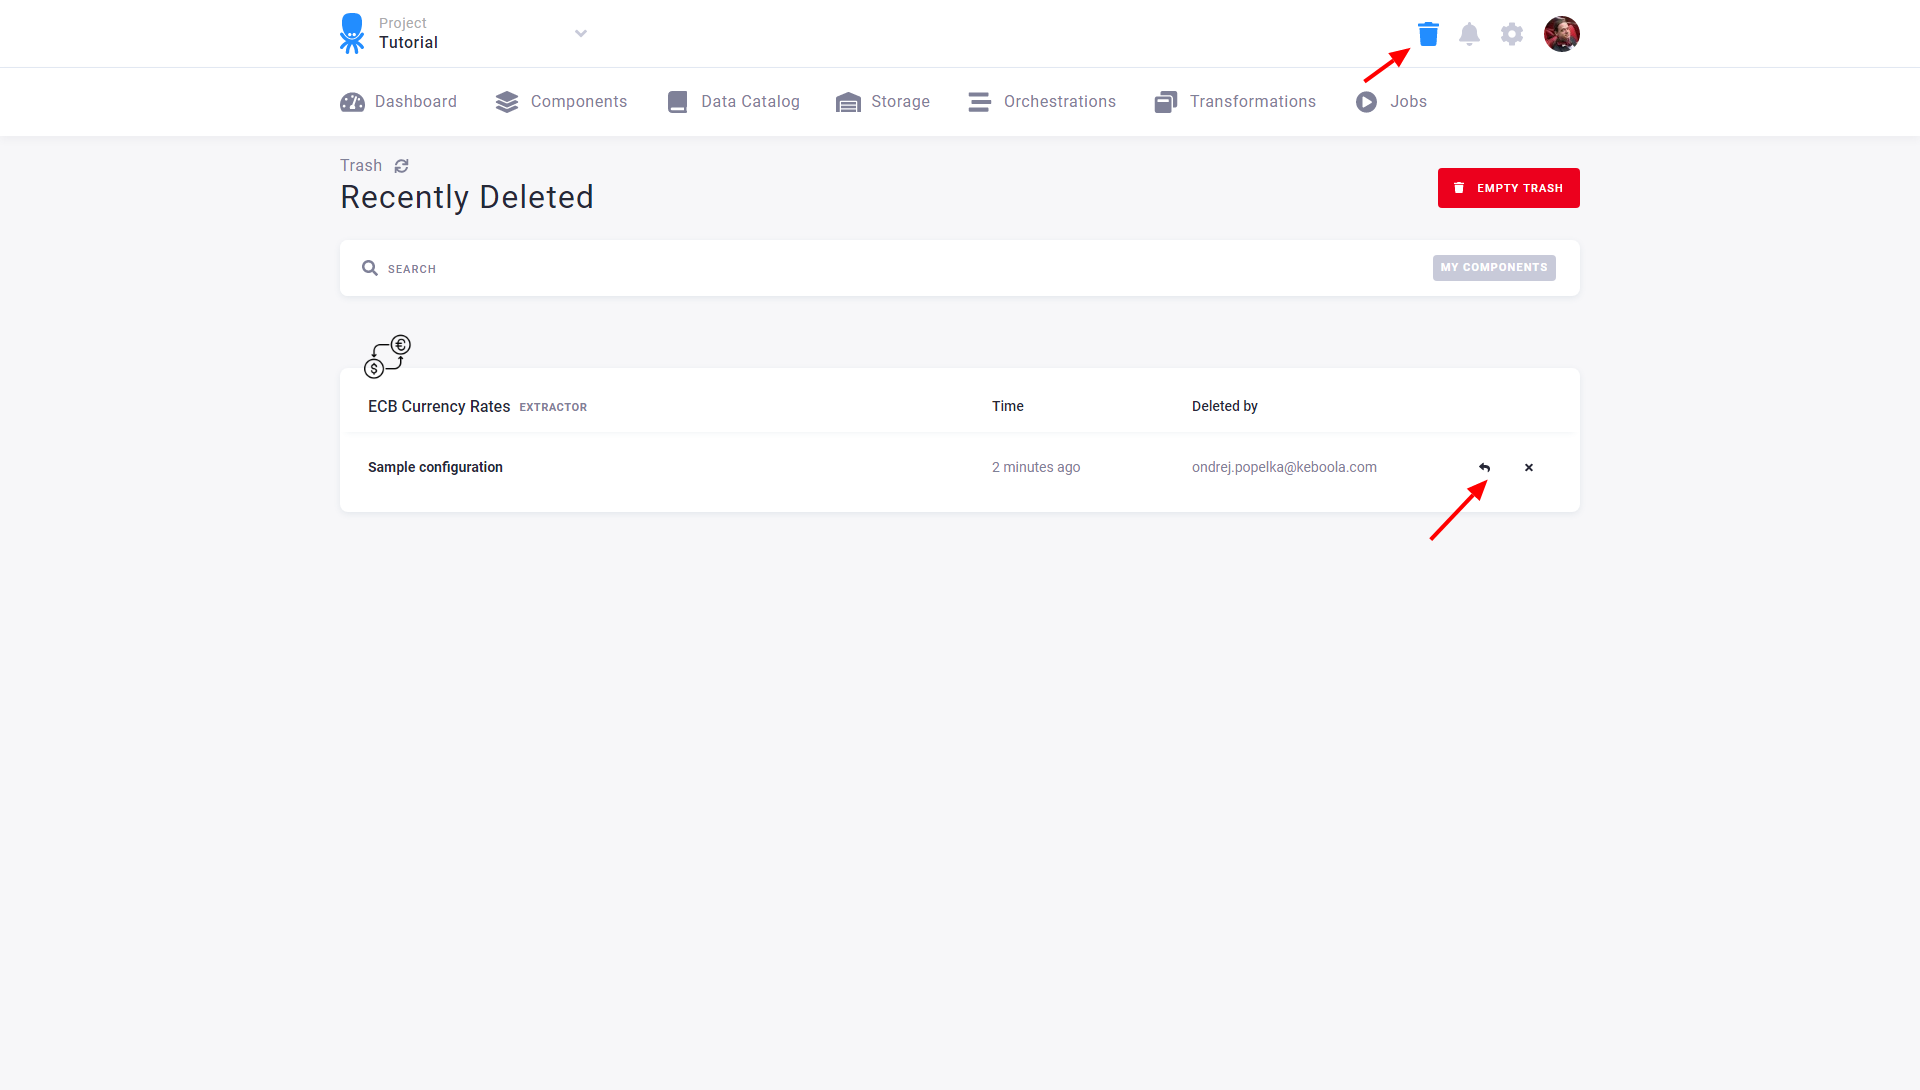
Each configuration moved to Trash acts as deleted: it is removed from flows, cannot be run, and is not displayed. You can undo the delete operation immediately, or you can restore the configuration from Trash, which is accessible from the main menu.
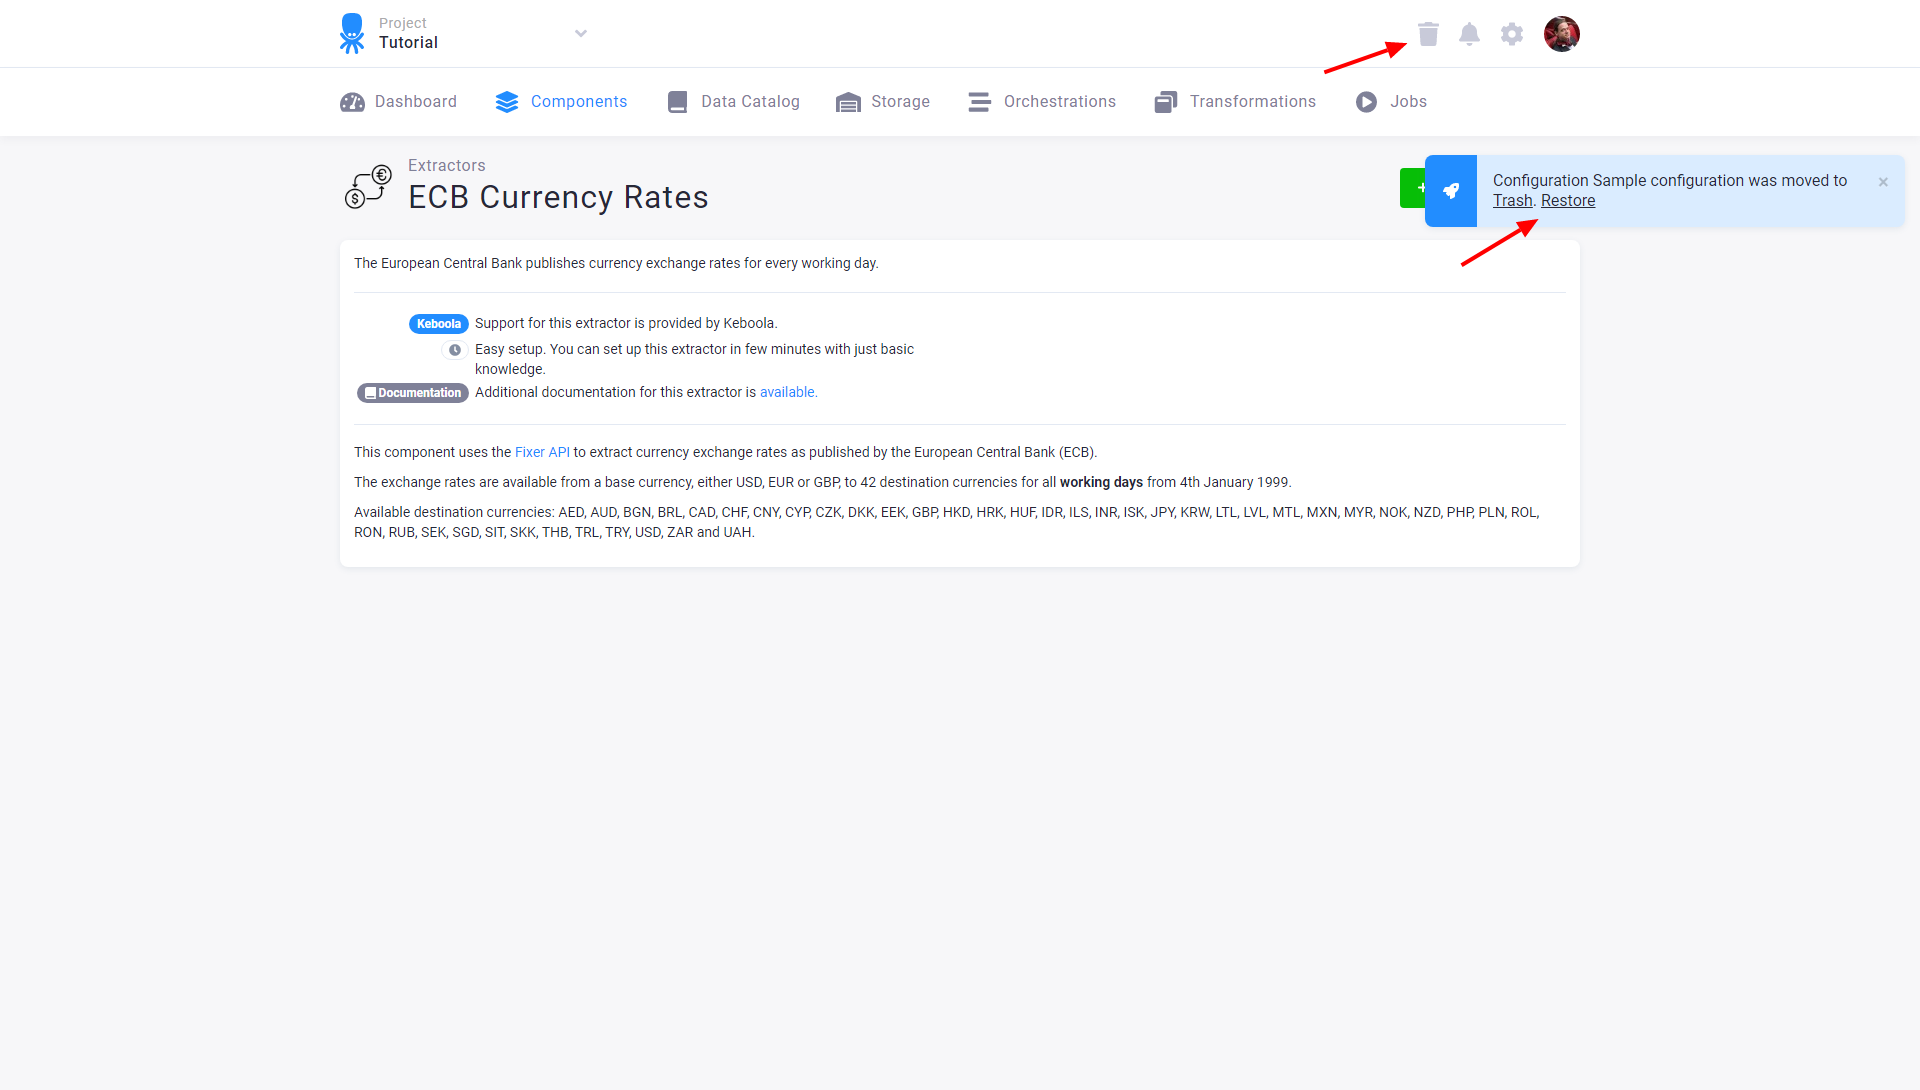
You can restore a deleted configuration or permanently remove it. Once deleted from Trash, no configuration can be recovered. If your Trash is filled with many configurations and you want to quickly find the one you need to restore or permanently remove, use the filter and search options in the upper part of the page.
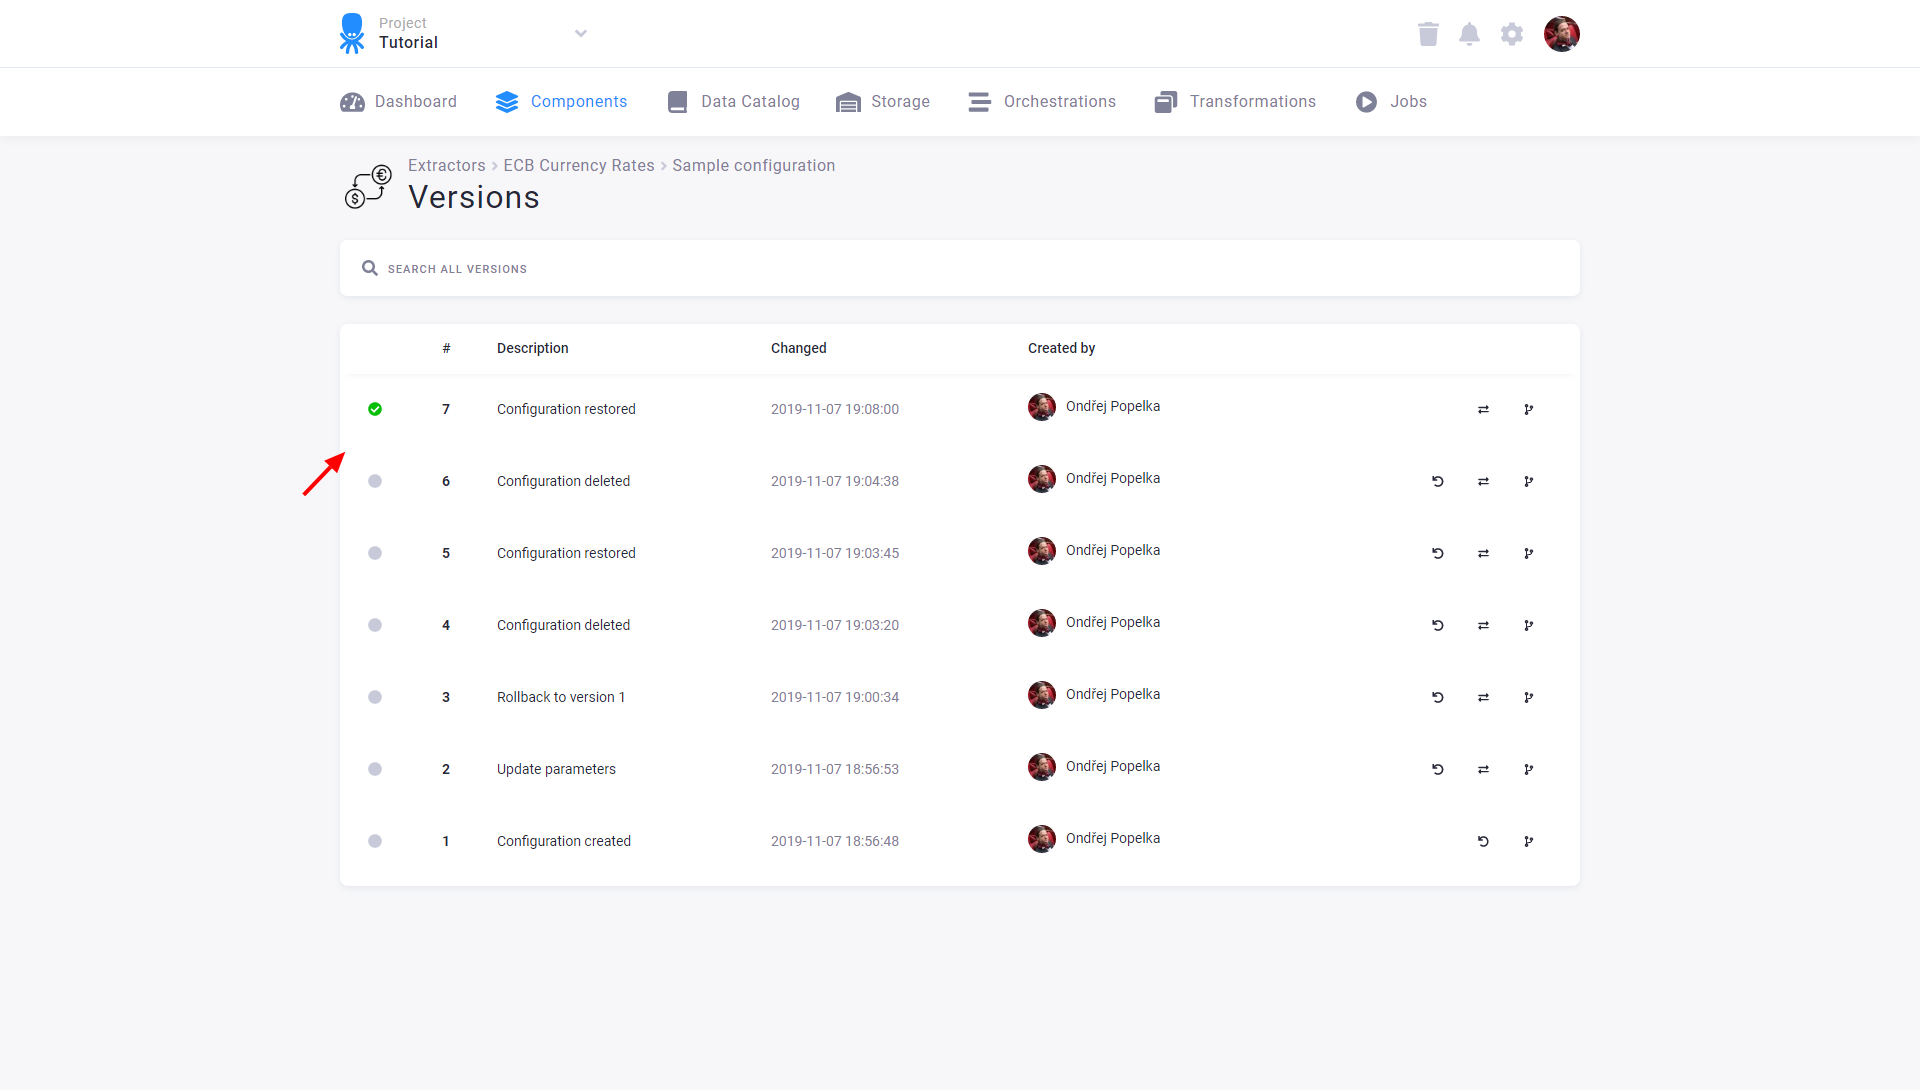
When you restore a configuration, its new version is created. Therefore, you can see the complete history in the configuration versions:
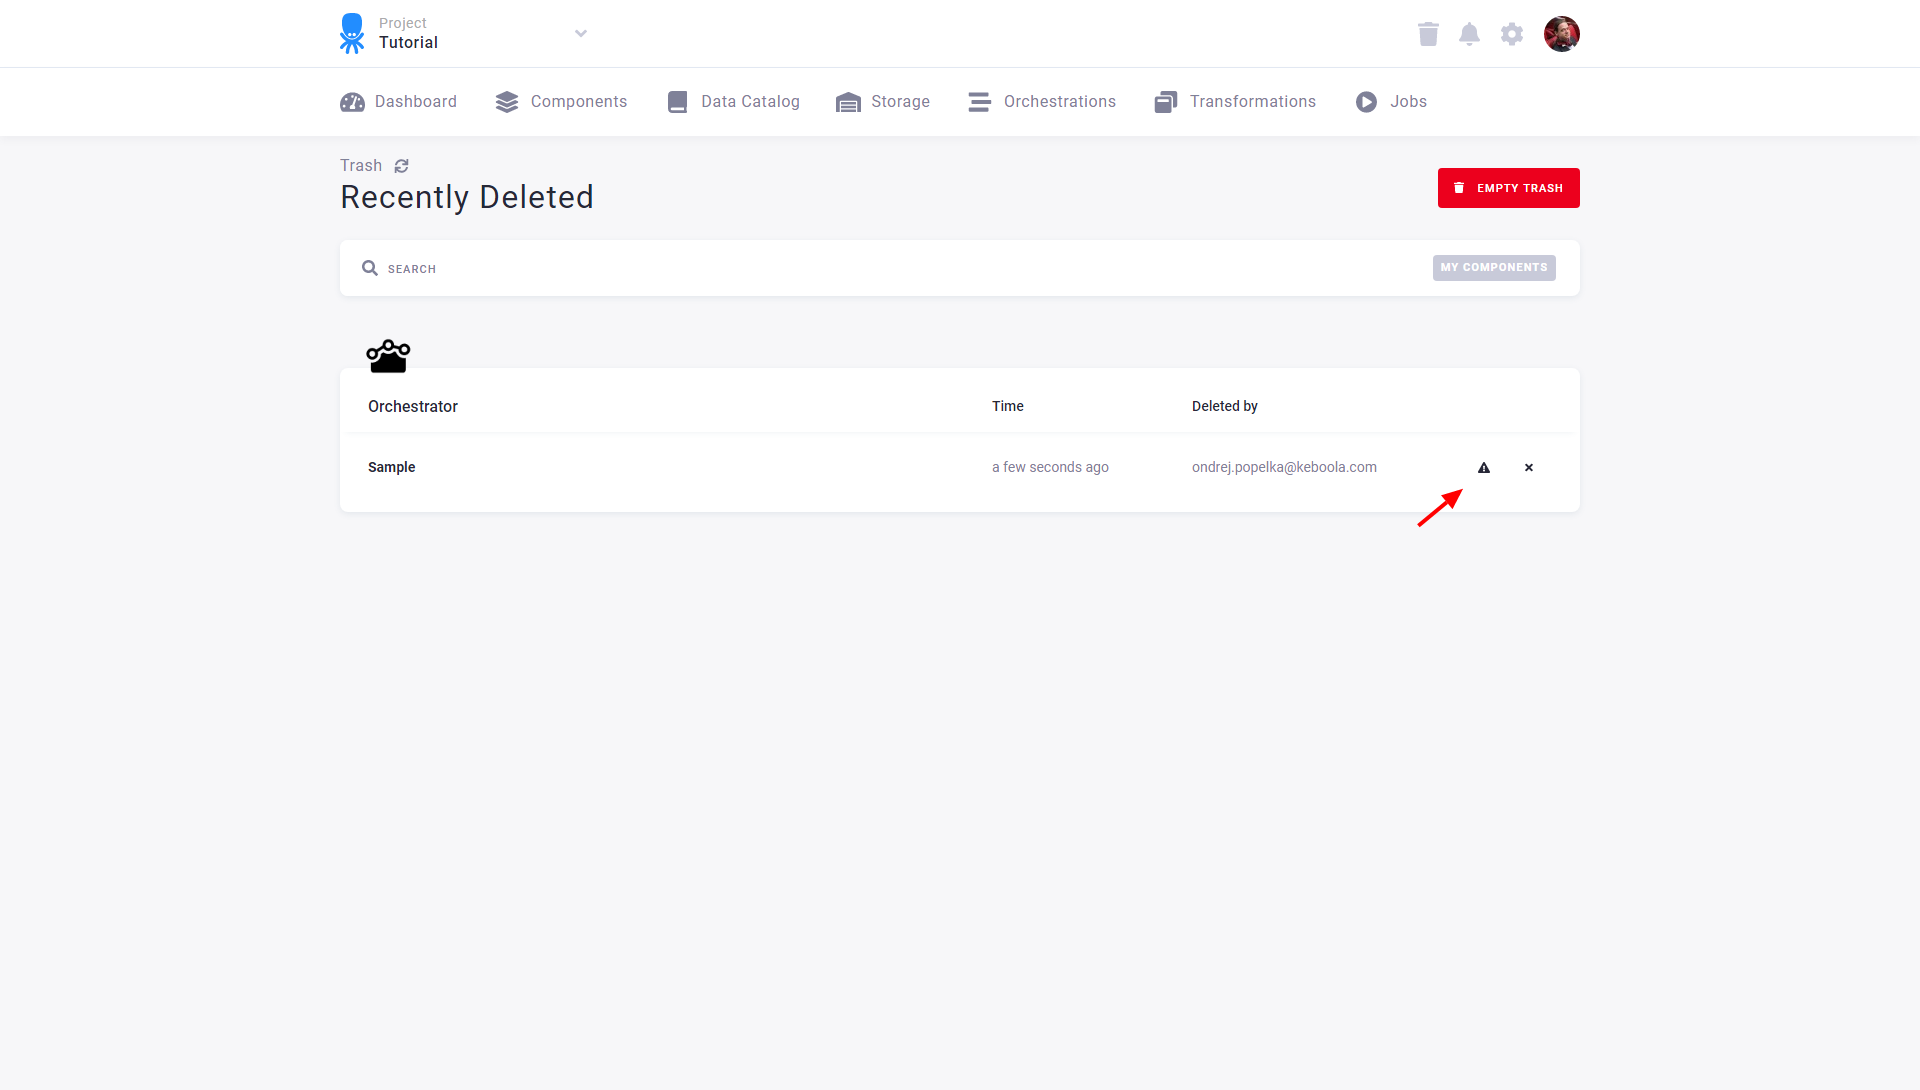
For technical reasons, configurations of the Orchestrator component cannot be restored when deleted. They will still be shown in Trash but cannot be restored:
Configuration Rows
Section titled “Configuration Rows”Some components support the concept of multiple configurations sharing some of their parameters. A typical example is database data source connectors, where multiple tables are extracted and share the same credentials. In such components, the configuration contains only the credentials and tables stored in configuration rows. The configuration acts as an envelope for the configuration rows.
The following example shows a configuration of the AWS S3 data source connector with three configuration rows:
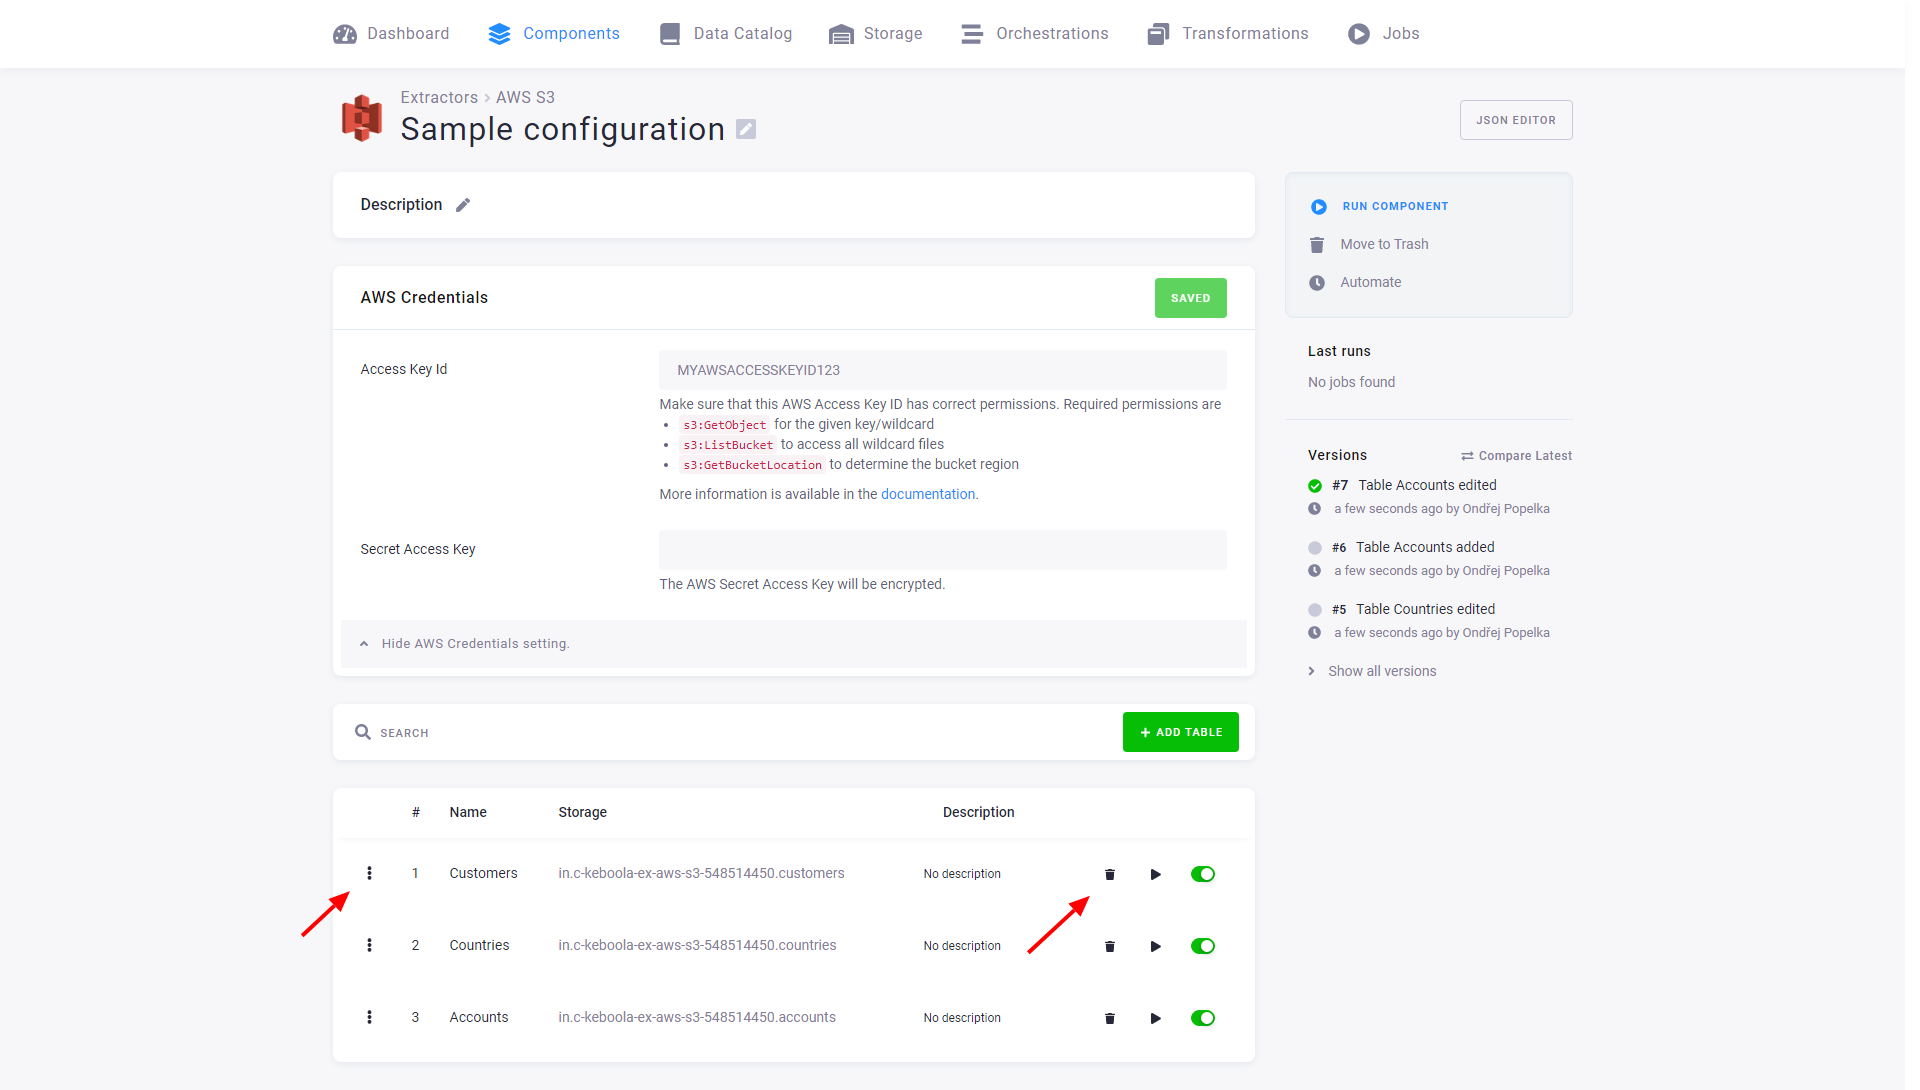
Each row can individually be modified or deleted. You can also disable a row, which means that if the entire configuration is run, the row will be skipped. You can also run a single row explicitly. Jobs that run only a single row have the label partial. Therefore, you can, for example, create a configuration that, on a scheduled run, extracts all the enabled tables and also contains tables that share the same credentials but are updated manually (or in a different flow).
You can add as many rows as you like; the list of configuration rows is fully searchable. You can also change the order of the rows. The order is maintained during processing, so you can use this to extract the large tables first, for example. The order of rows does not affect your project because a Job is only finished after each row is processed.
Configuration Rows Versions
Section titled “Configuration Rows Versions”Changes to configuration rows are part of the configuration versioning. The following image shows that the versions in the configuration page list changes to the configuration rows – both that a table was added and that it was modified.
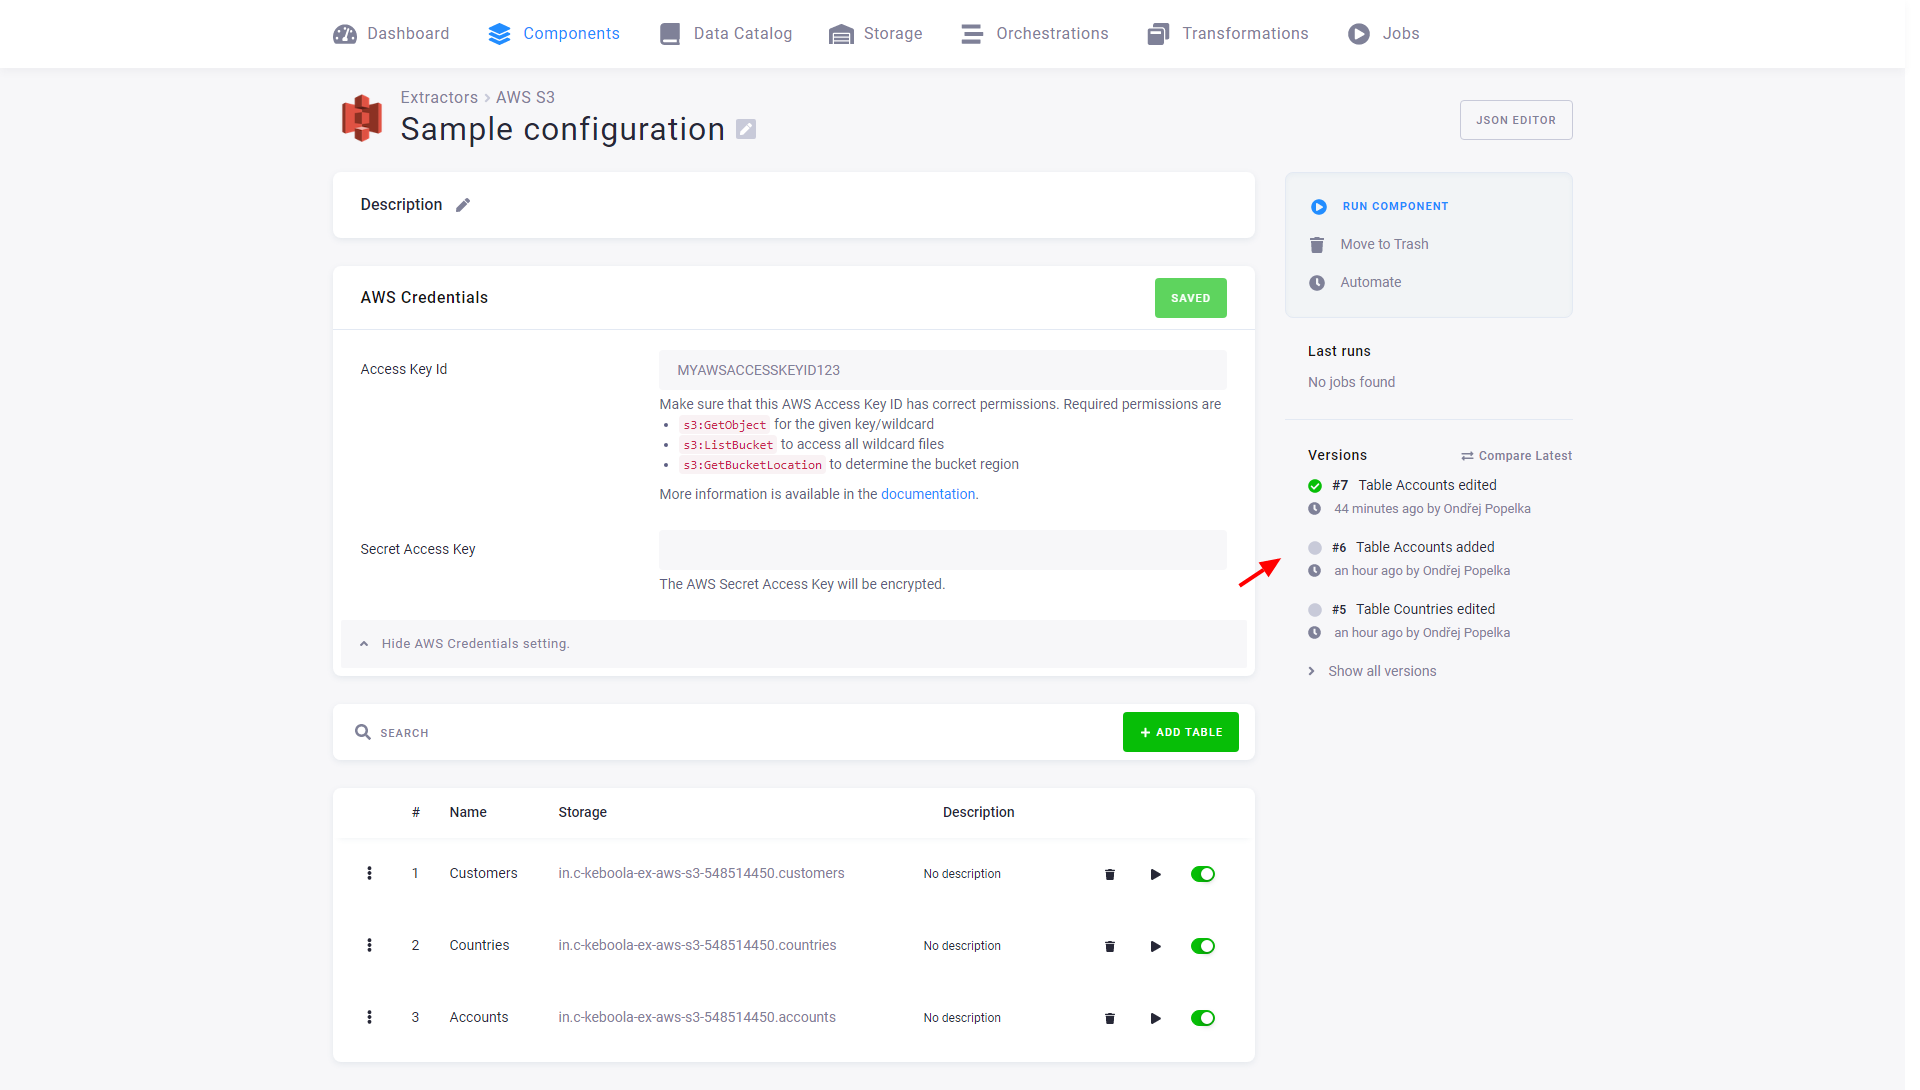
That means that each configuration version contains a complete set of its rows. This is important when copying or rolling back a version – you can do these operations safely without worrying about rows.
When you edit a configuration row, a list of row versions appears. Row versions show changes only to the single row. You can roll back a row to a previous version without interacting with the other rows.

Running Component Configuration Jobs in Parallel
Section titled “Running Component Configuration Jobs in Parallel”All components (usually data source and destination connectors) that support configuration rows now have the option to set job parallelism at the configuration level. This means you can control the speed of an extraction or writing process and specify which scenarios you want to speed up.
This setting is optional, with the default option being Parallel jobs: Off.
Example: If your configuration has five rows and you set the parallelism to 2, the five jobs will be processed in three consecutive sets (2 + 2 + 1). The jobs within each set will run in parallel.
For a full explanation of how parallelism interacts with system limits, billing, and when it actually helps, see Running Jobs in Parallel.
Authorization
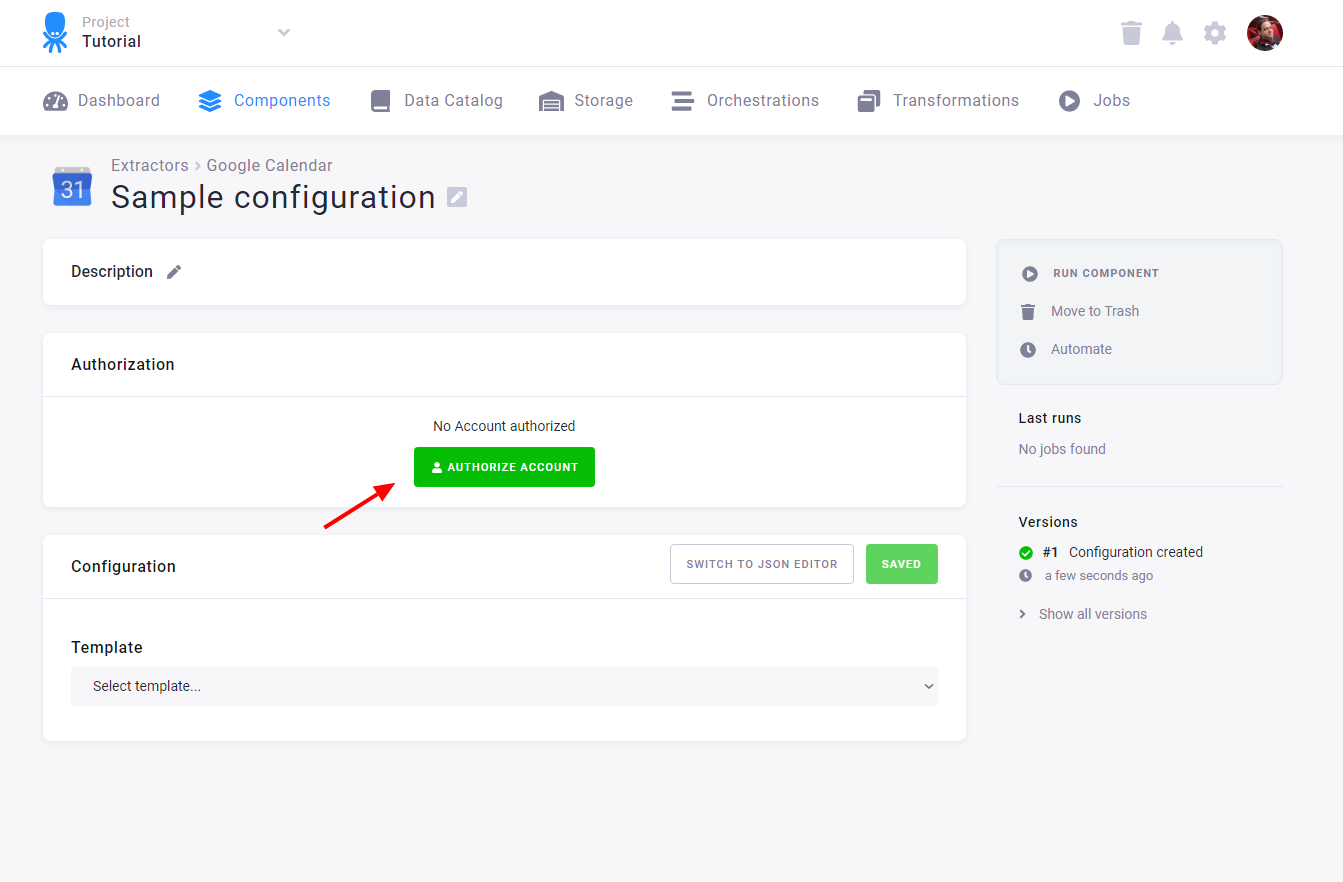
Section titled “Authorization”Many services support authorization using the OAuth protocol. For you (as the end user), this means that the service does not require entering credentials (username, password, token, etc.). Instead, you are redirected to the service itself, where you authorize the Keboola component. Then, you are redirected back to Keboola, where you can set other parameters and run the configuration.
The OAuth authorization process begins with the Authorize button (in this example, the Google Calendar data source connector is shown):
In the next step, you can choose the authorization method:
- Instant: Use this method if you have direct access to the account; the authorization will be done immediately.
- External: If you need to authorize access to the service from someone who does not have an account in Keboola, you can generate an external link, which will guide them through this process.
OAuth authorization is a very secure authorization method in which you don’t have to hand over the credentials to your account. The consumer—the Keboola component—obtains only the minimal required access. The authorization is only valid for the configuration in which it was created and its copies.
Instant Authorization
Section titled “Instant Authorization”Instant authorization requires you to log in to the service you want to use. With instant authorization, you have to enter a name describing the account you’re going to use:
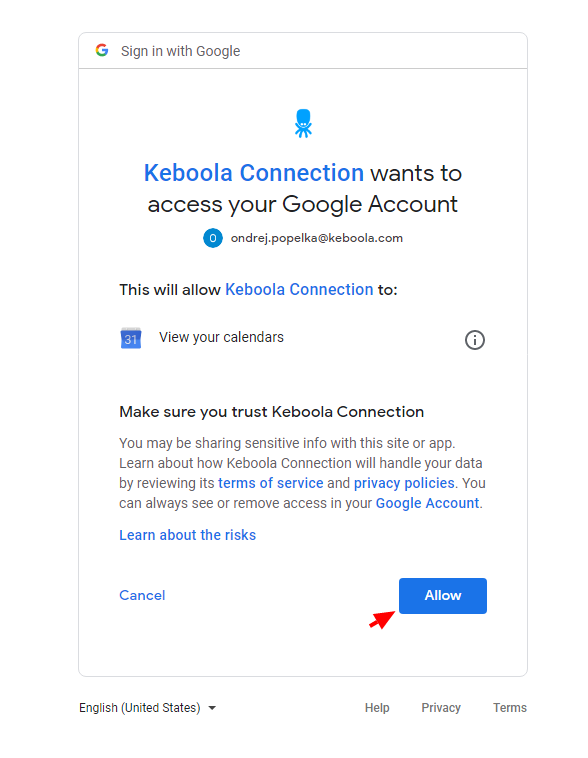
Next, you are taken to the actual authorization screen. This is provided by the service itself and varies widely. In the example below, the authorization for Google Calendar is shown.
External Authorization
Section titled “External Authorization”An external account can be used in cases where you do not have direct access to the service and the service account owner can’t share the credentials with you. For example, they may belong to a different company or department, or sharing the credentials would leak some permissions. In such cases, you can ask the account owner to authorize the component configuration for you.
The first step is to generate the authorization link:
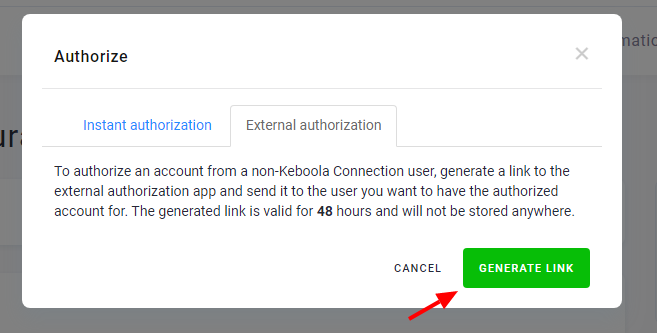
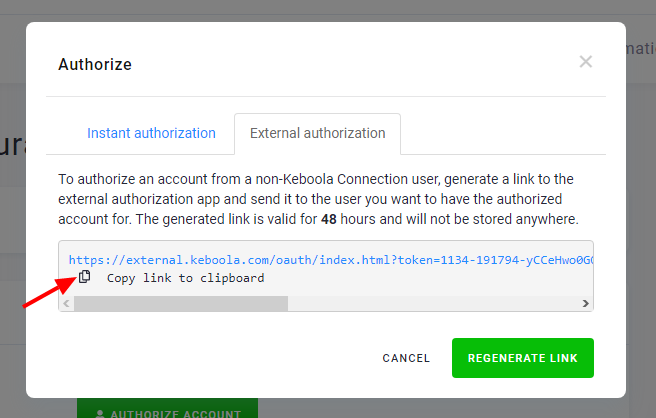
Then, you can copy the link and send it to the account owner. The link is valid for 48 hours. If it expires, you must regenerate and resend it.
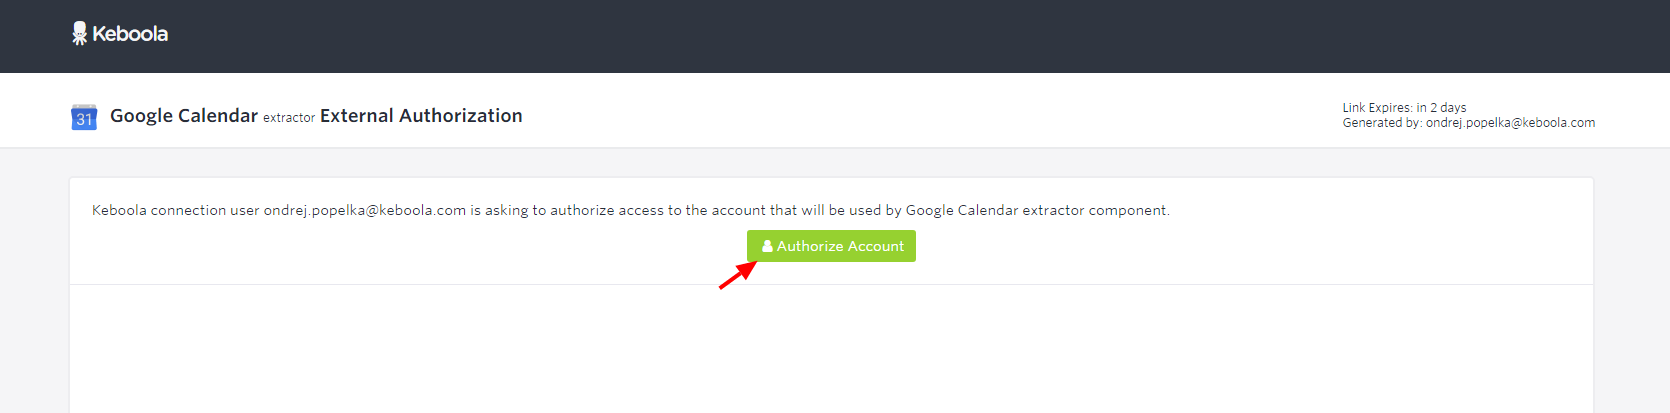
When the account owner clicks the link, they’re taken to a special page. There, they can confirm what they are authorizing and who requested the action. Then, they can click Authorize Account to proceed:
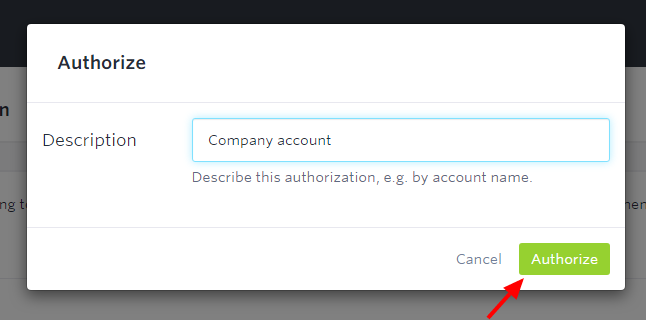
In the next step, the account owner has to enter the account name:
Then they are taken to the actual authorization screen. This is provided by the service itself and varies widely. In the example below, the authorization for Google Calendar is shown.
Resetting Authorization
Section titled “Resetting Authorization”You can reset an existing authorization by clicking the Reset button.
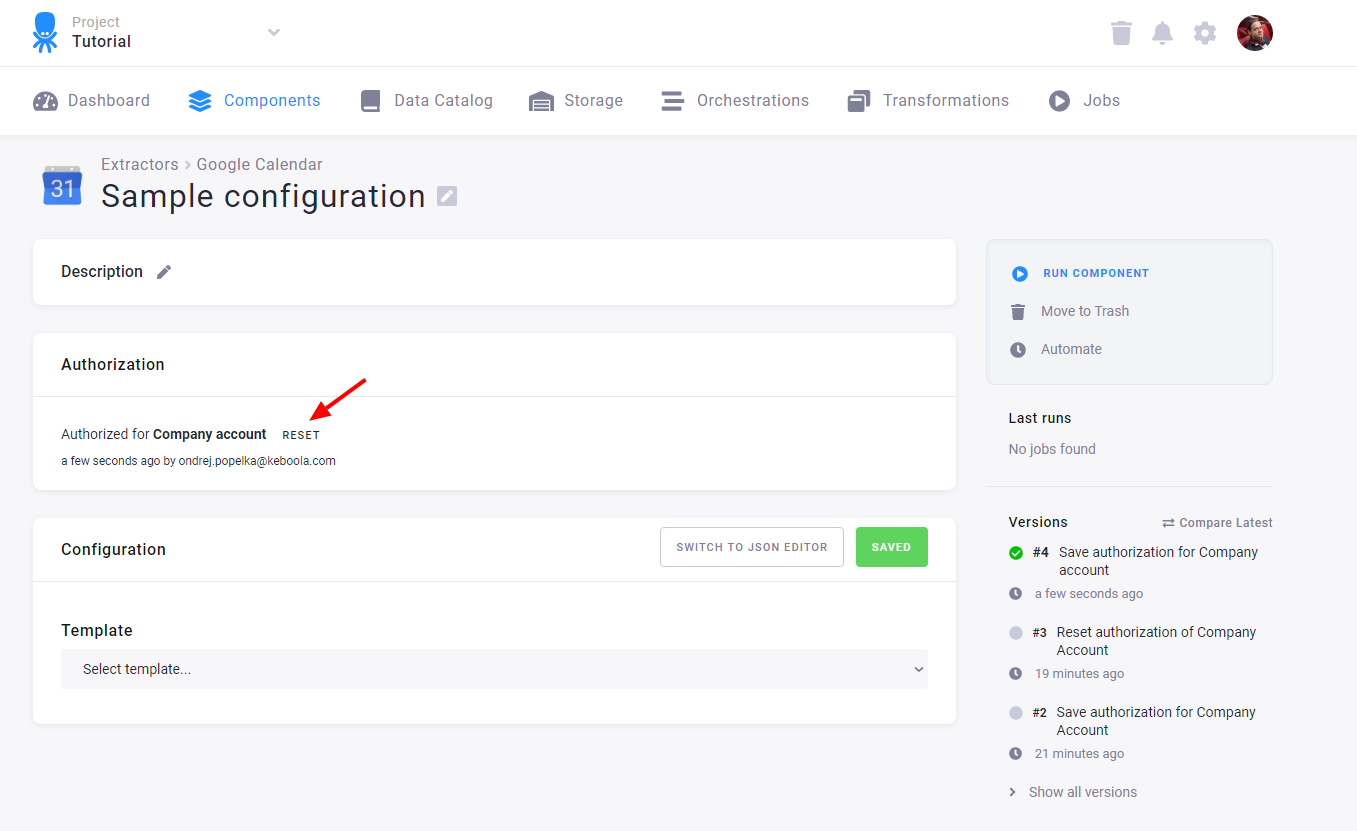
This invalidates the authorization obtained from the service and allows you to reauthorize the configuration. Note that if you reset the authorization of a configuration that was copied, all the copies will lose the authorization. The authorization can also be revoked from within the service. In that case the configuration will stop working, and you will have to reset and reauthorize it.
Debug Mode
Section titled “Debug Mode”Clicking the Debug mode link allows you to access the JSON configuration directly, along with some advanced options on how to run the component.
By editing the full JSON configuration, you can set up the component (all options are described in the component repository) and the processors (to learn more about processors, see the Developers Docs).

Changing the JSON configuration may render the visual form unable to represent the configuration, and switching back may be disabled. Reverting such changes will re-enable the visual form. But the JSON will translate back to the visual form whenever possible and vice versa.
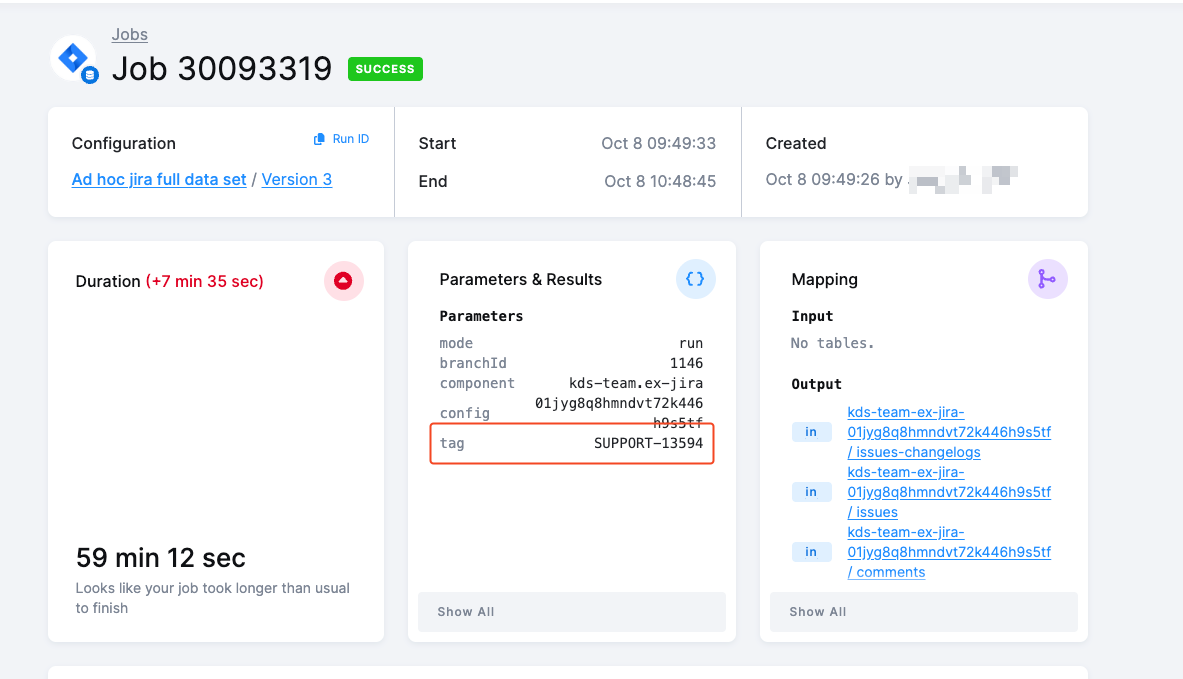
Run custom tag
Section titled “Run custom tag”When in Debug Mode, the Run Custom Tag option allows you to execute a specific version of a component.
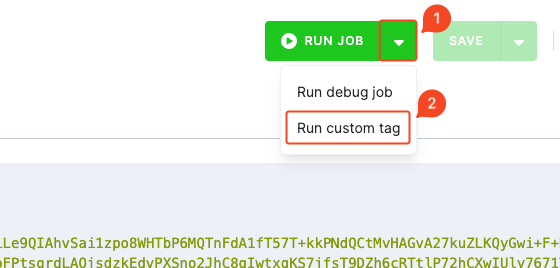
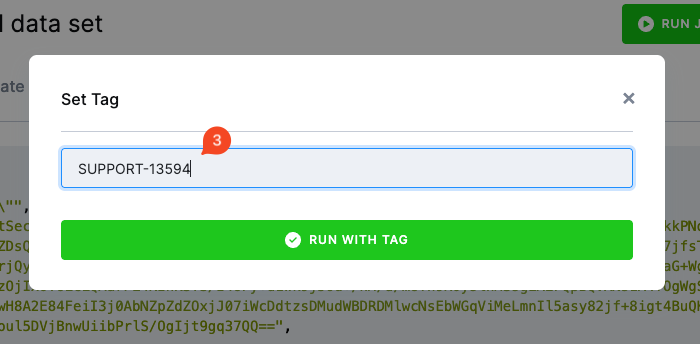
In most cases, you will not need to use this option directly. However, our team may occasionally ask you to run a component under a custom tag — either as part of troubleshooting an issue you have reported to our support team, or as part of the release management process to test a new version before its official release.
You can confirm that the job ran under the custom tag in the job’s Parameters & Results section.