Relational Sync Data Source Connectors for SQL Databases
Each data source connector (extractor) from an SQL database allows you to extract data from selected tables or results from arbitrary SQL queries. This category of DB connectors performs direct queries against the source system, enabling the Time-stamp based CDC replication.
The connectors for supported SQL databases (Cloudera Impala, Firebird, IBM DB2, Microsoft SQL Server, MySQL, Oracle, PostgreSQL, Teradata) are configured similarly and offer an advanced mode. All notable differences are listed in the section Server Specific Notes.
Before you start configuring your SQL data source connector, consider setting up an SSH tunnel to secure your connection to your internal database and avoid exposing your database server to the Internet.
Initial Setup
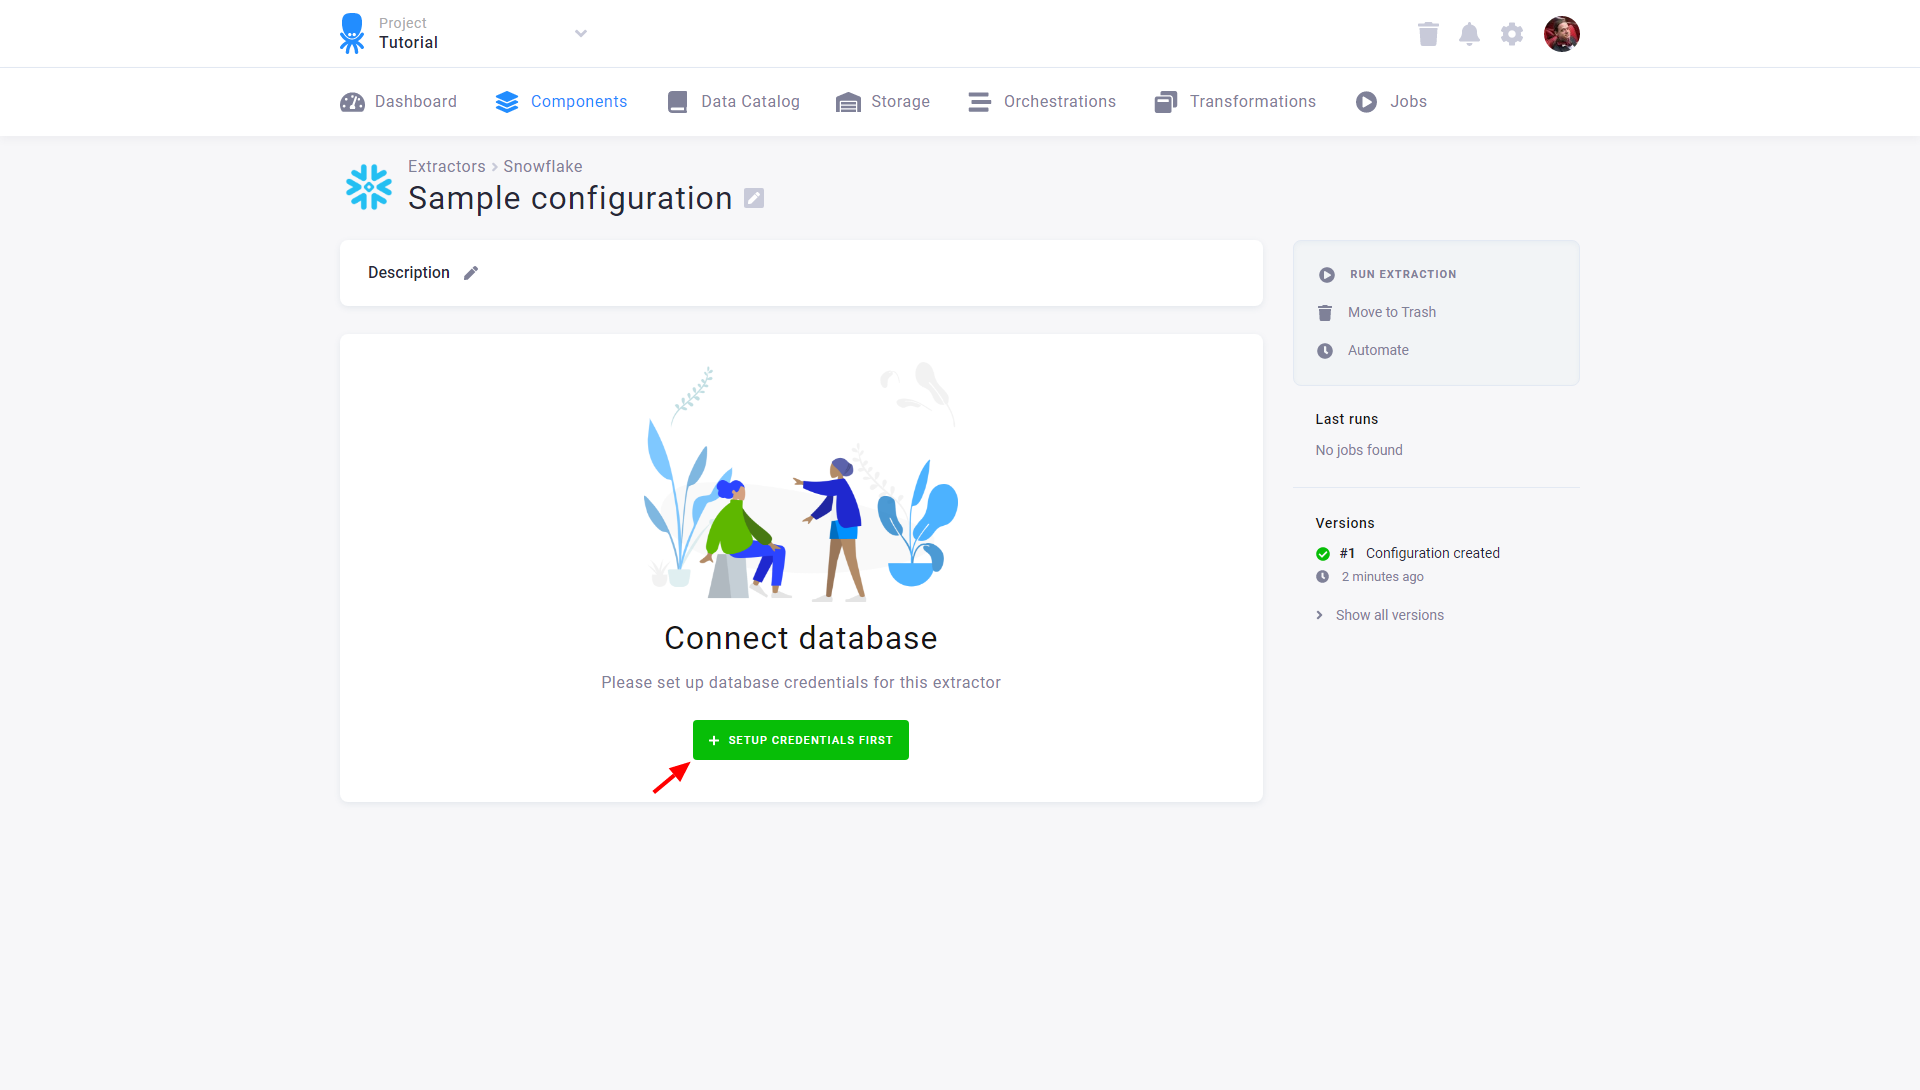
Section titled “Initial Setup”After you create a configuration, the first step is to configure database credentials using the Set Up Credentials First button:
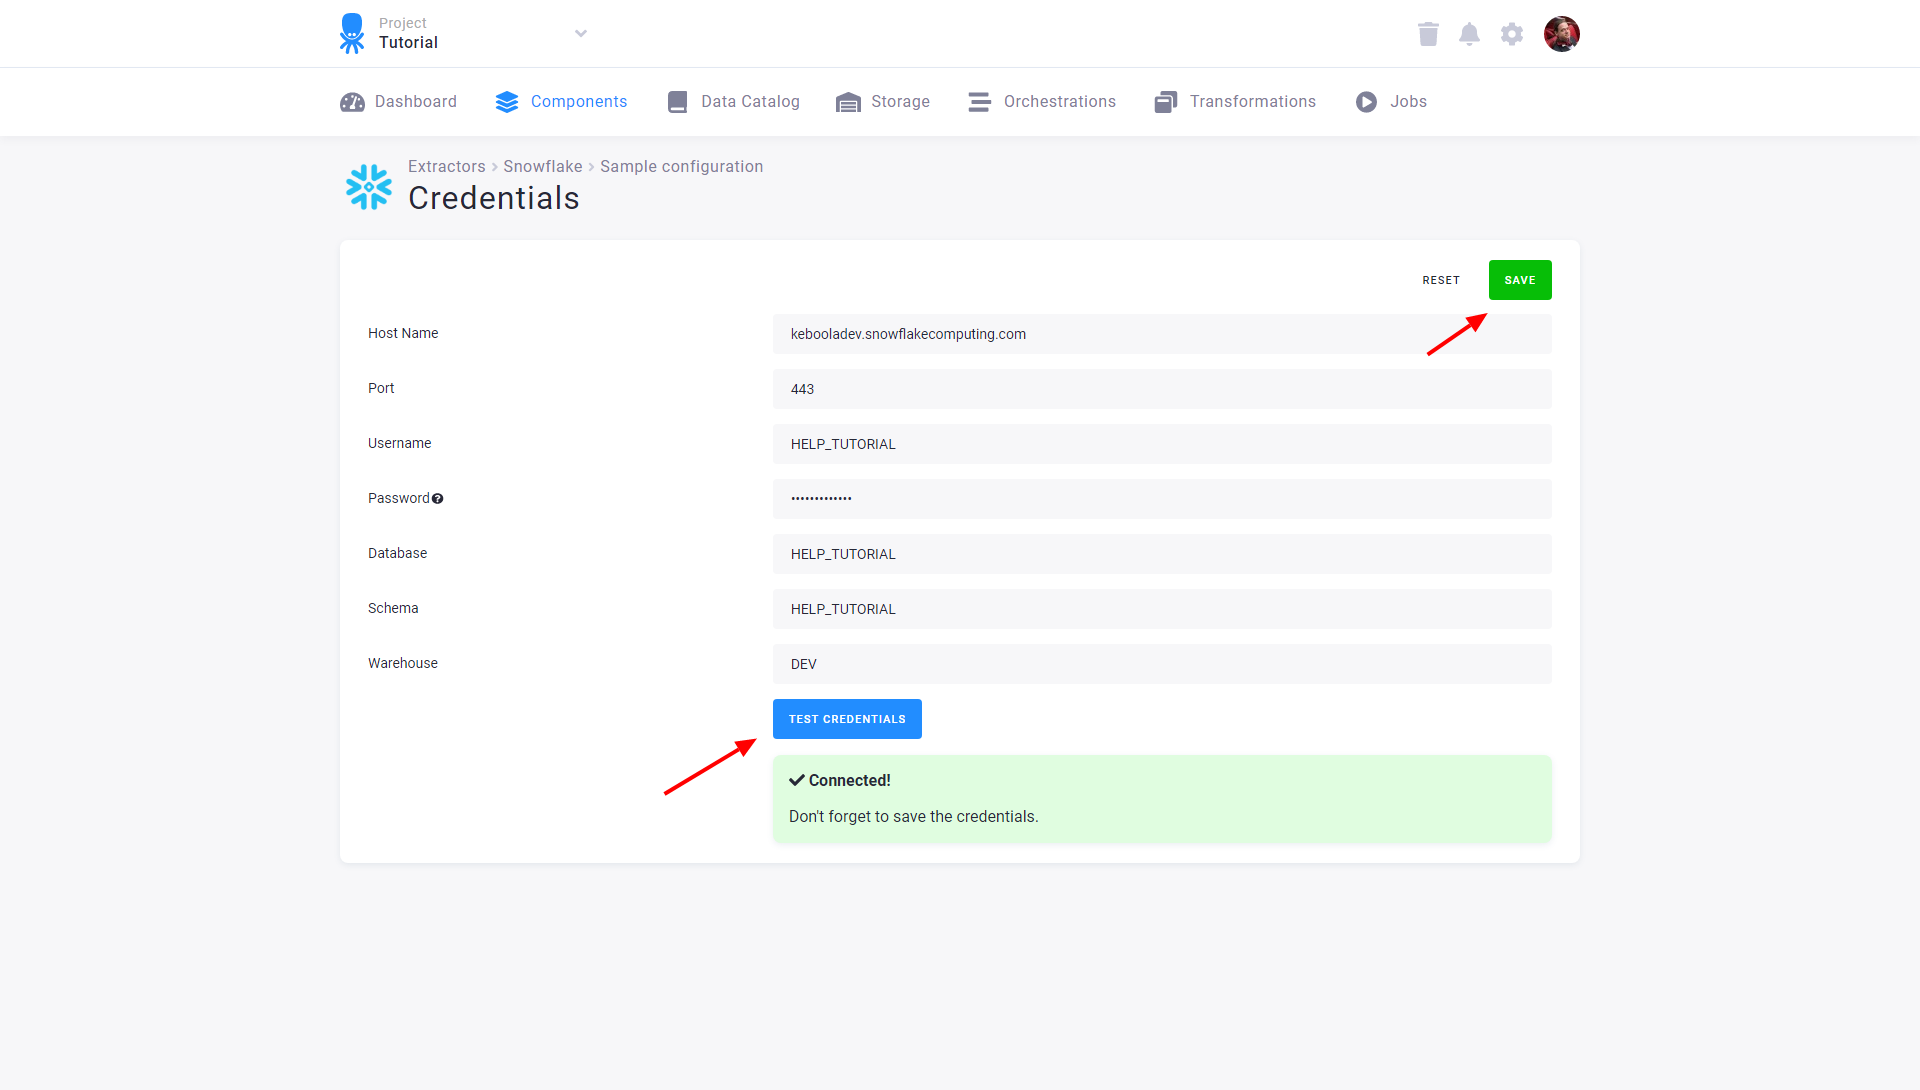
Fill in the credentials to the database. See the section Server Specific Notes for a description of non-standard fields. After testing the credentials, click Save:
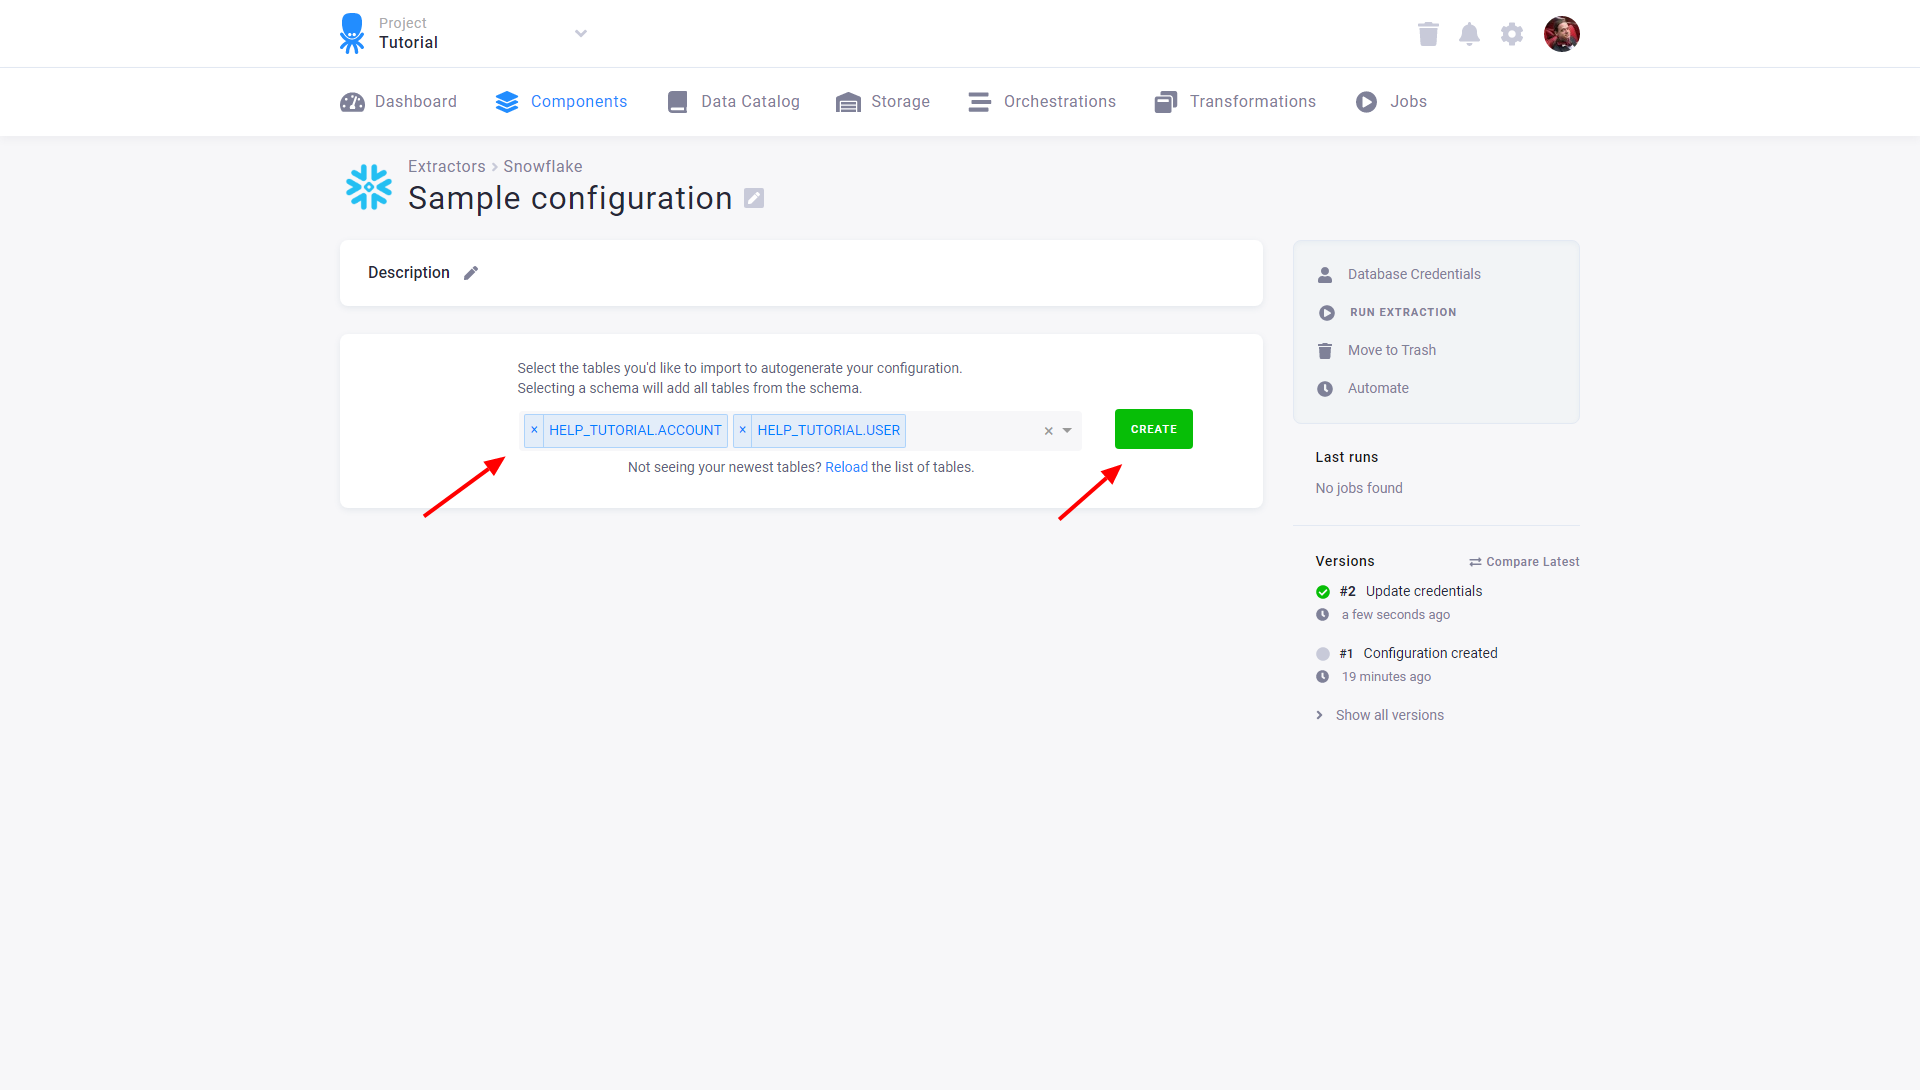
After you save the credentials, the connector will automatically fetch the list of all database tables accessible by the provided credentials. Select the tables you want to extract and click the Create button:
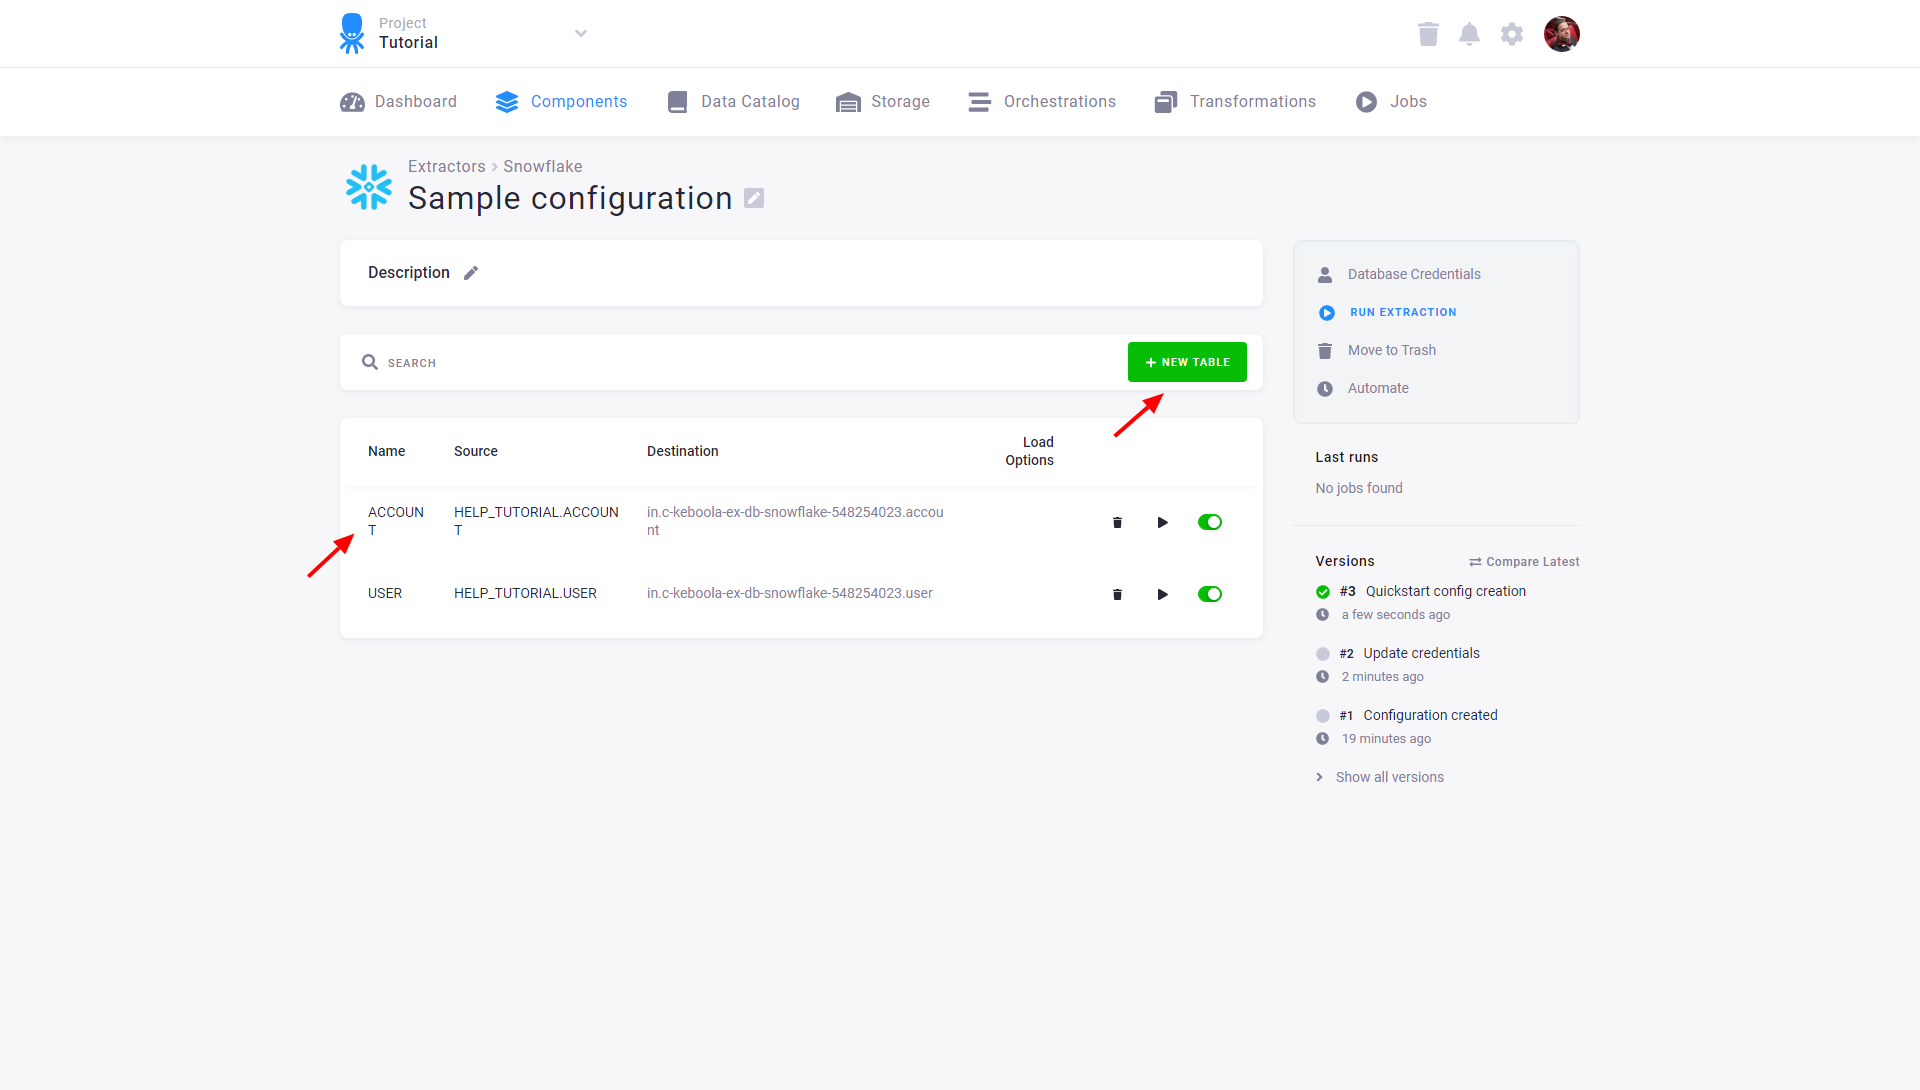
You can modify the configured tables by clicking on the appropriate row or adding new tables via the New Table button. Each table may also be extracted individually or disabled so that it is not extracted when the entire configuration is run. Existing credentials can be changed using the Database Credentials link.
Modify Configuration
Section titled “Modify Configuration”If you want to modify the table extraction setup, click on the corresponding row. You’ll get to the table detail view:
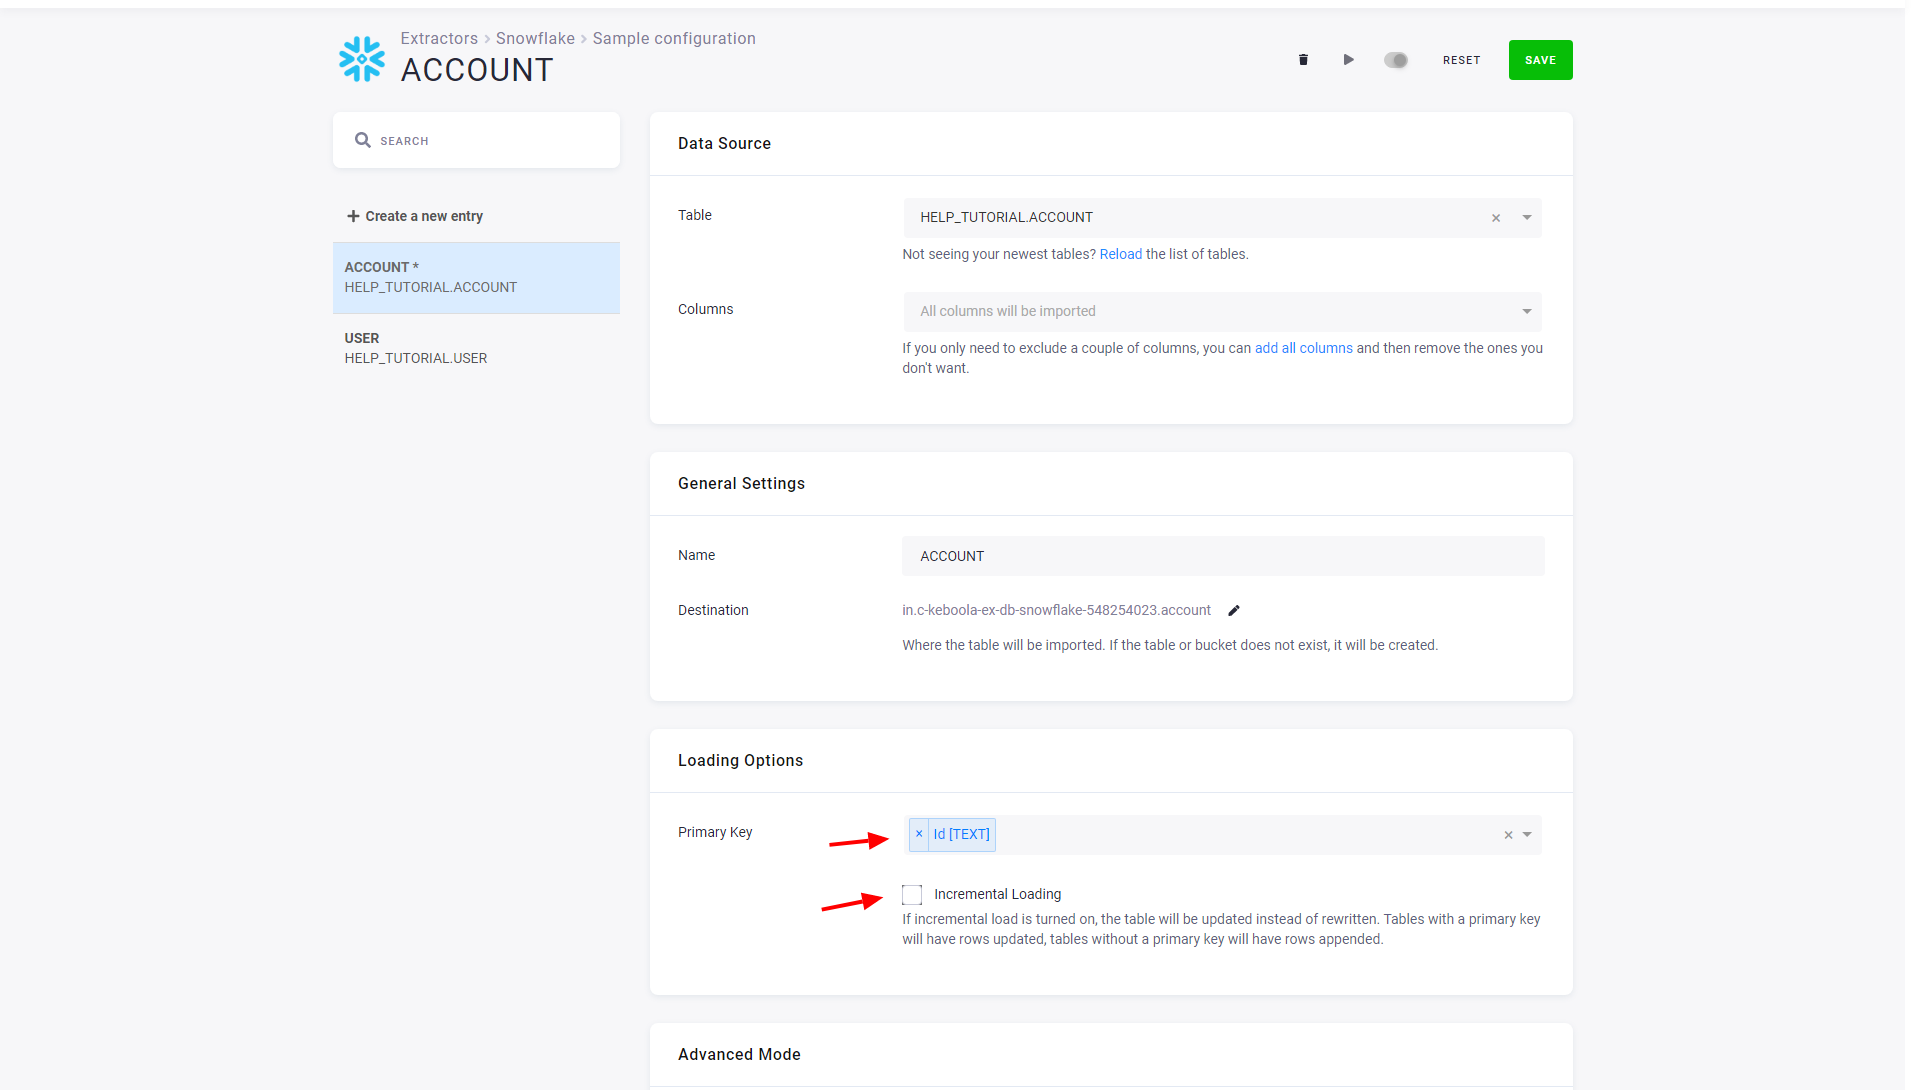
You can modify the source table, limit the extraction to specific columns, or change the destination table name in Storage. The table detail also allows you to define a primary key and incremental loading. We highly recommend you define a primary key where possible. Primary keys substantially speed up the data loads and further table processing. Also, incremental loading should be used when possible, which considerably speeds up the data loads. Both options require knowledge of the source table, so don’t turn them on blindly.
Advanced Mode
Section titled “Advanced Mode”The table detail also allows you to switch to the advanced mode:
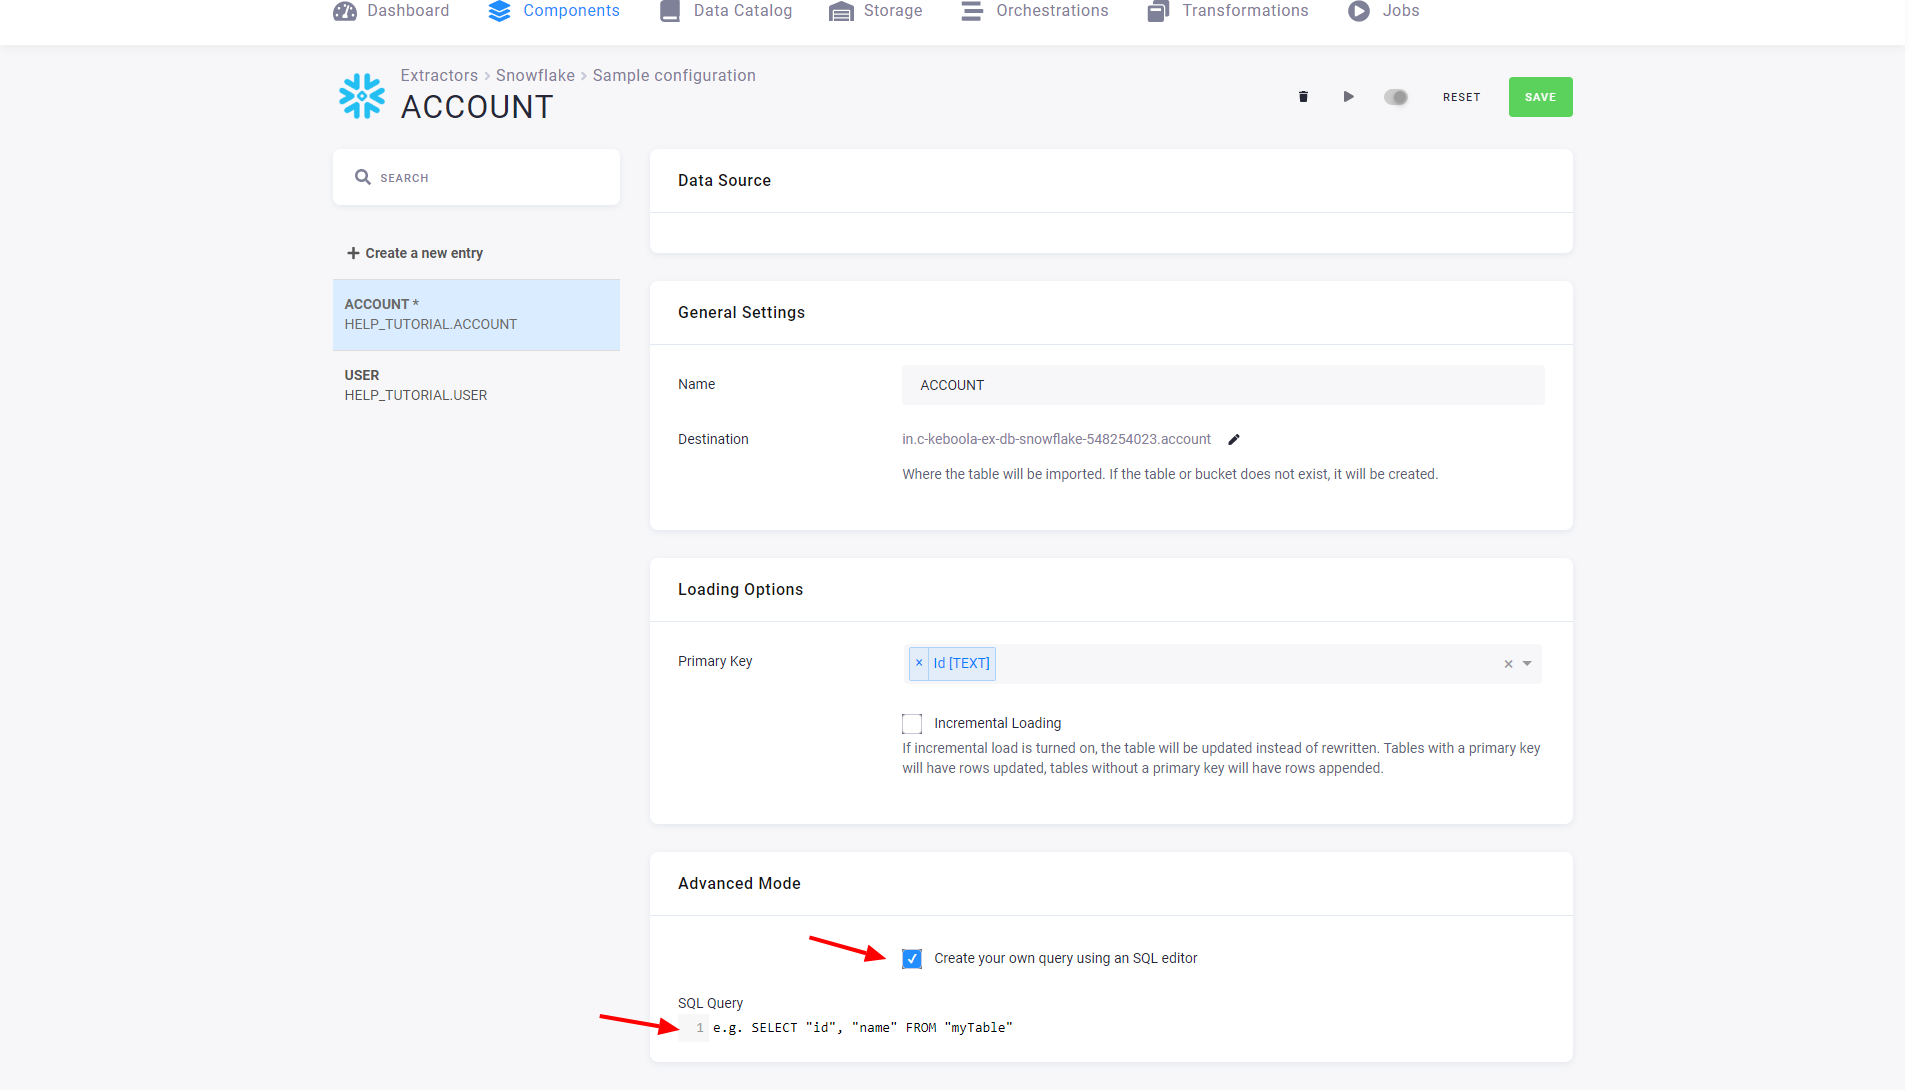
In the advanced mode, you can write an arbitrary SELECT query. Its result will be imported into a
Storage table. The SQL query is executed on the source server without any processing. That means you must
follow the SQL dialect of the particular server you’re working with.
Please keep the following in mind when using the advanced mode:
- Use as simple queries as possible.
- Define a primary key where possible.
Avoid doing complex joins and aggregations in SQL queries. Remember that these queries are executed on the database server you are extracting from. This database system might not be designed or optimized for complex SELECT queries. Complex queries may result in timeouts or produce unnecessary loads on your internal systems. Instead, import raw data and use Keboola tools to give it the desired shape.
Server Specific Notes
Section titled “Server Specific Notes”MySQL Encryption
Section titled “MySQL Encryption”The MySQL database server also supports encrypting all database communication using SSL Certificates. See the official guide for instructions on setting it up.
MySQL Network Compression
Section titled “MySQL Network Compression”The MySQL database server enables MySQL Network Compression. The pros and cons of this feature are quite well discussed on StackOverflow.
MySQL Transaction Isolation Level
Section titled “MySQL Transaction Isolation Level”The MySQL database server enables transaction isolation level.
PostgreSQL Encryption
Section titled “PostgreSQL Encryption”The PostgreSQL database server also supports encrypting all database communication using SSL Certificates. See the official guide for instructions on setting it up.
MS SQL Server Encryption
Section titled “MS SQL Server Encryption”The MS SQL database server also supports encrypting the whole database communication using SSL Certificates. See the official guide for instructions on setting it up.
MS SQL Server Advanced Mode
Section titled “MS SQL Server Advanced Mode”The SQL Server export uses the BCP utility to export data.
For this reason, if you are writing advanced mode queries, you have to quote the values of non-numeric columns (text, datetime, etc.) so that the selected
value is "some text" instead of some text. This can be done by, e.g., SELECT char(34) + [my_text_column] + char(34).
The CHAR function with argument 34 produces
the double quote character ".
When the extracted text itself may contain quotes, you need to escape them by replacing " with "". A full example:
SELECT char(34) + REPLACE([my_varchar_column], char(34), char(34) + char(34)) + char(34) FROM [my_table]The data source connector will still work if you don’t do these things, but the BCP will fail, and the backup, a much slower method,
will be used. The message BCP command failed: ... Attempting export using pdo_sqlsrv will be logged in the extraction
job events in that case.
Null characters
Section titled “Null characters”You can remove null characters (\u0000) from text by using the REPLACE function
REPLACE([column_name] COLLATE Latin1_General_BIN, char(0), '').
In the context of the previous example, the query will look like this:
SELECT char(34) + REPLACE( REPLACE([column_name] COLLATE Latin1_General_BIN, char(0), ''), char(34), char(34) + char(34)) + char(34)FROM [my_table]Azure-Hosted MS SQL Server
Section titled “Azure-Hosted MS SQL Server”An SQL Server instance hosted on Azure will typically have a hostname such as [srvName].databases.windows.net.
If the hostname is provided as an IP address, for example, 123.123.123.123, the username needs to have the suffix @[srvName] as in keboola@srvKeboola.
Snowflake
Section titled “Snowflake”When extracting data from a Snowflake database, permissions must be set to allow the specified user to use the specified warehouse.
The following SQL code creates the role, and the user KEBOOLA_SNOWFLAKE_EXTRACTOR and grants them access
to the warehouse MY_WAREHOUSE, the database MY_DATA, and the schema MY_SCHEMA.
CREATE ROLE KEBOOLA_SNOWFLAKE_EXTRACTOR;GRANT USAGE ON WAREHOUSE MY_WAREHOUSE TO ROLE KEBOOLA_SNOWFLAKE_EXTRACTOR;GRANT USAGE ON DATABASE MY_DATA TO ROLE KEBOOLA_SNOWFLAKE_EXTRACTOR;GRANT USAGE ON SCHEMA MY_DATA.MY_SCHEMA TO ROLE KEBOOLA_SNOWFLAKE_EXTRACTOR;GRANT SELECT ON ALL TABLES IN SCHEMA MY_DATA.MY_SCHEMA TO ROLE KEBOOLA_SNOWFLAKE_EXTRACTOR;GRANT SELECT ON ALL VIEWS IN SCHEMA MY_DATA.MY_SCHEMA TO ROLE KEBOOLA_SNOWFLAKE_EXTRACTOR;CREATE USER KEBOOLA_SNOWFLAKE_EXTRACTOR PASSWORD = 'MY_PASSWORD' DEFAULT_ROLE = KEBOOLA_SNOWFLAKE_EXTRACTOR MUST_CHANGE_PASSWORD = FALSE TYPE = LEGACY_SERVICE;GRANT ROLE KEBOOLA_SNOWFLAKE_EXTRACTOR TO USER KEBOOLA_SNOWFLAKE_EXTRACTOR;Note that with the above setup, the user will not have access to newly created tables. You will either have to use a more permissive role or reset the permissions by calling:
GRANT SELECT ON ALL TABLES IN SCHEMA MY_DATA.MY_SCHEMA TO ROLE KEBOOLA_SNOWFLAKE_EXTRACTOR;GRANT SELECT ON ALL VIEWS IN SCHEMA MY_DATA.MY_SCHEMA TO ROLE KEBOOLA_SNOWFLAKE_EXTRACTOR;Oracle tnsnames.ora File
Section titled “Oracle tnsnames.ora File”The Oracle database server also supports tnsnames.ora configuration file instead hostname and port number. See the official guide for instructions on setting it up.